CDNetworks Documentation
AWS S3 Bucket Acceleration
In this example, let’s assume we have a domain called waytoo.digital, and that we want to set up an Amazon Web Services (AWS) bucket on a subdomain called files.waytoo.digital so users can access the data in that bucket through this subdomain.
We'll start by creating and accessing the public AWS bucket, and then we'll look into how to access the private AWS bucket.
Setting Up an S3 Bucket
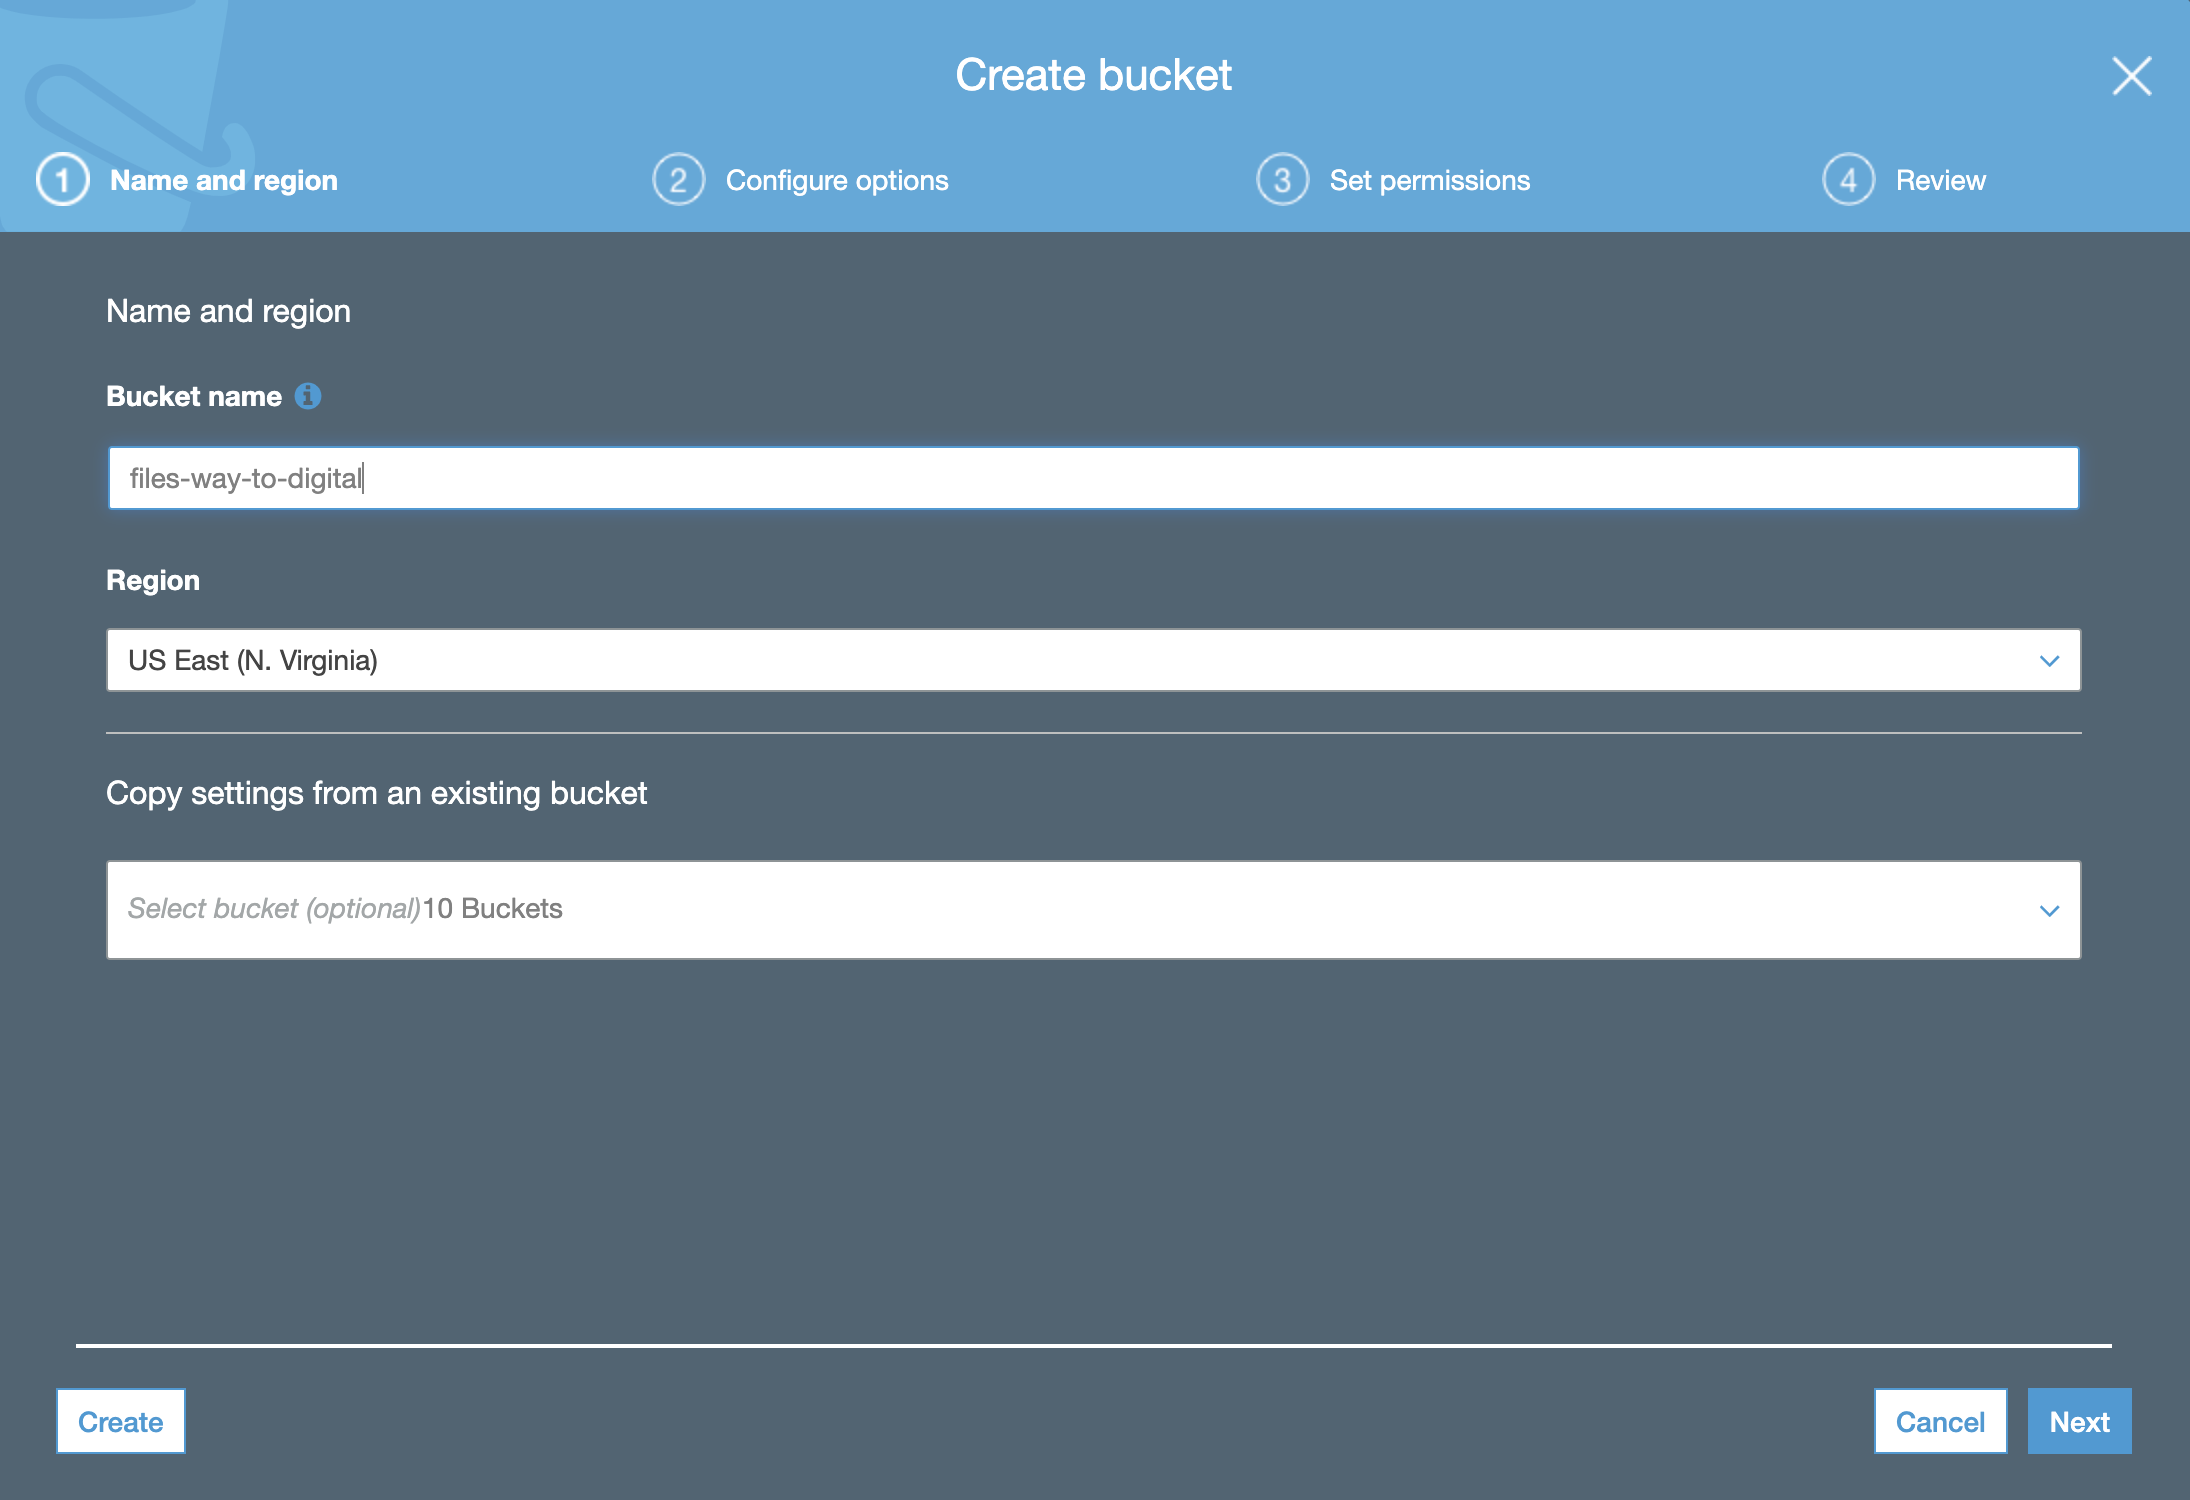
- Log in to the AWS S3 console and create a new bucket. The creation wizard appears.
-
Enter the following bucket name(DNS qualified prefix): files-waytoo-digital
-
Click Next.
-
Skip Configure Options.
-
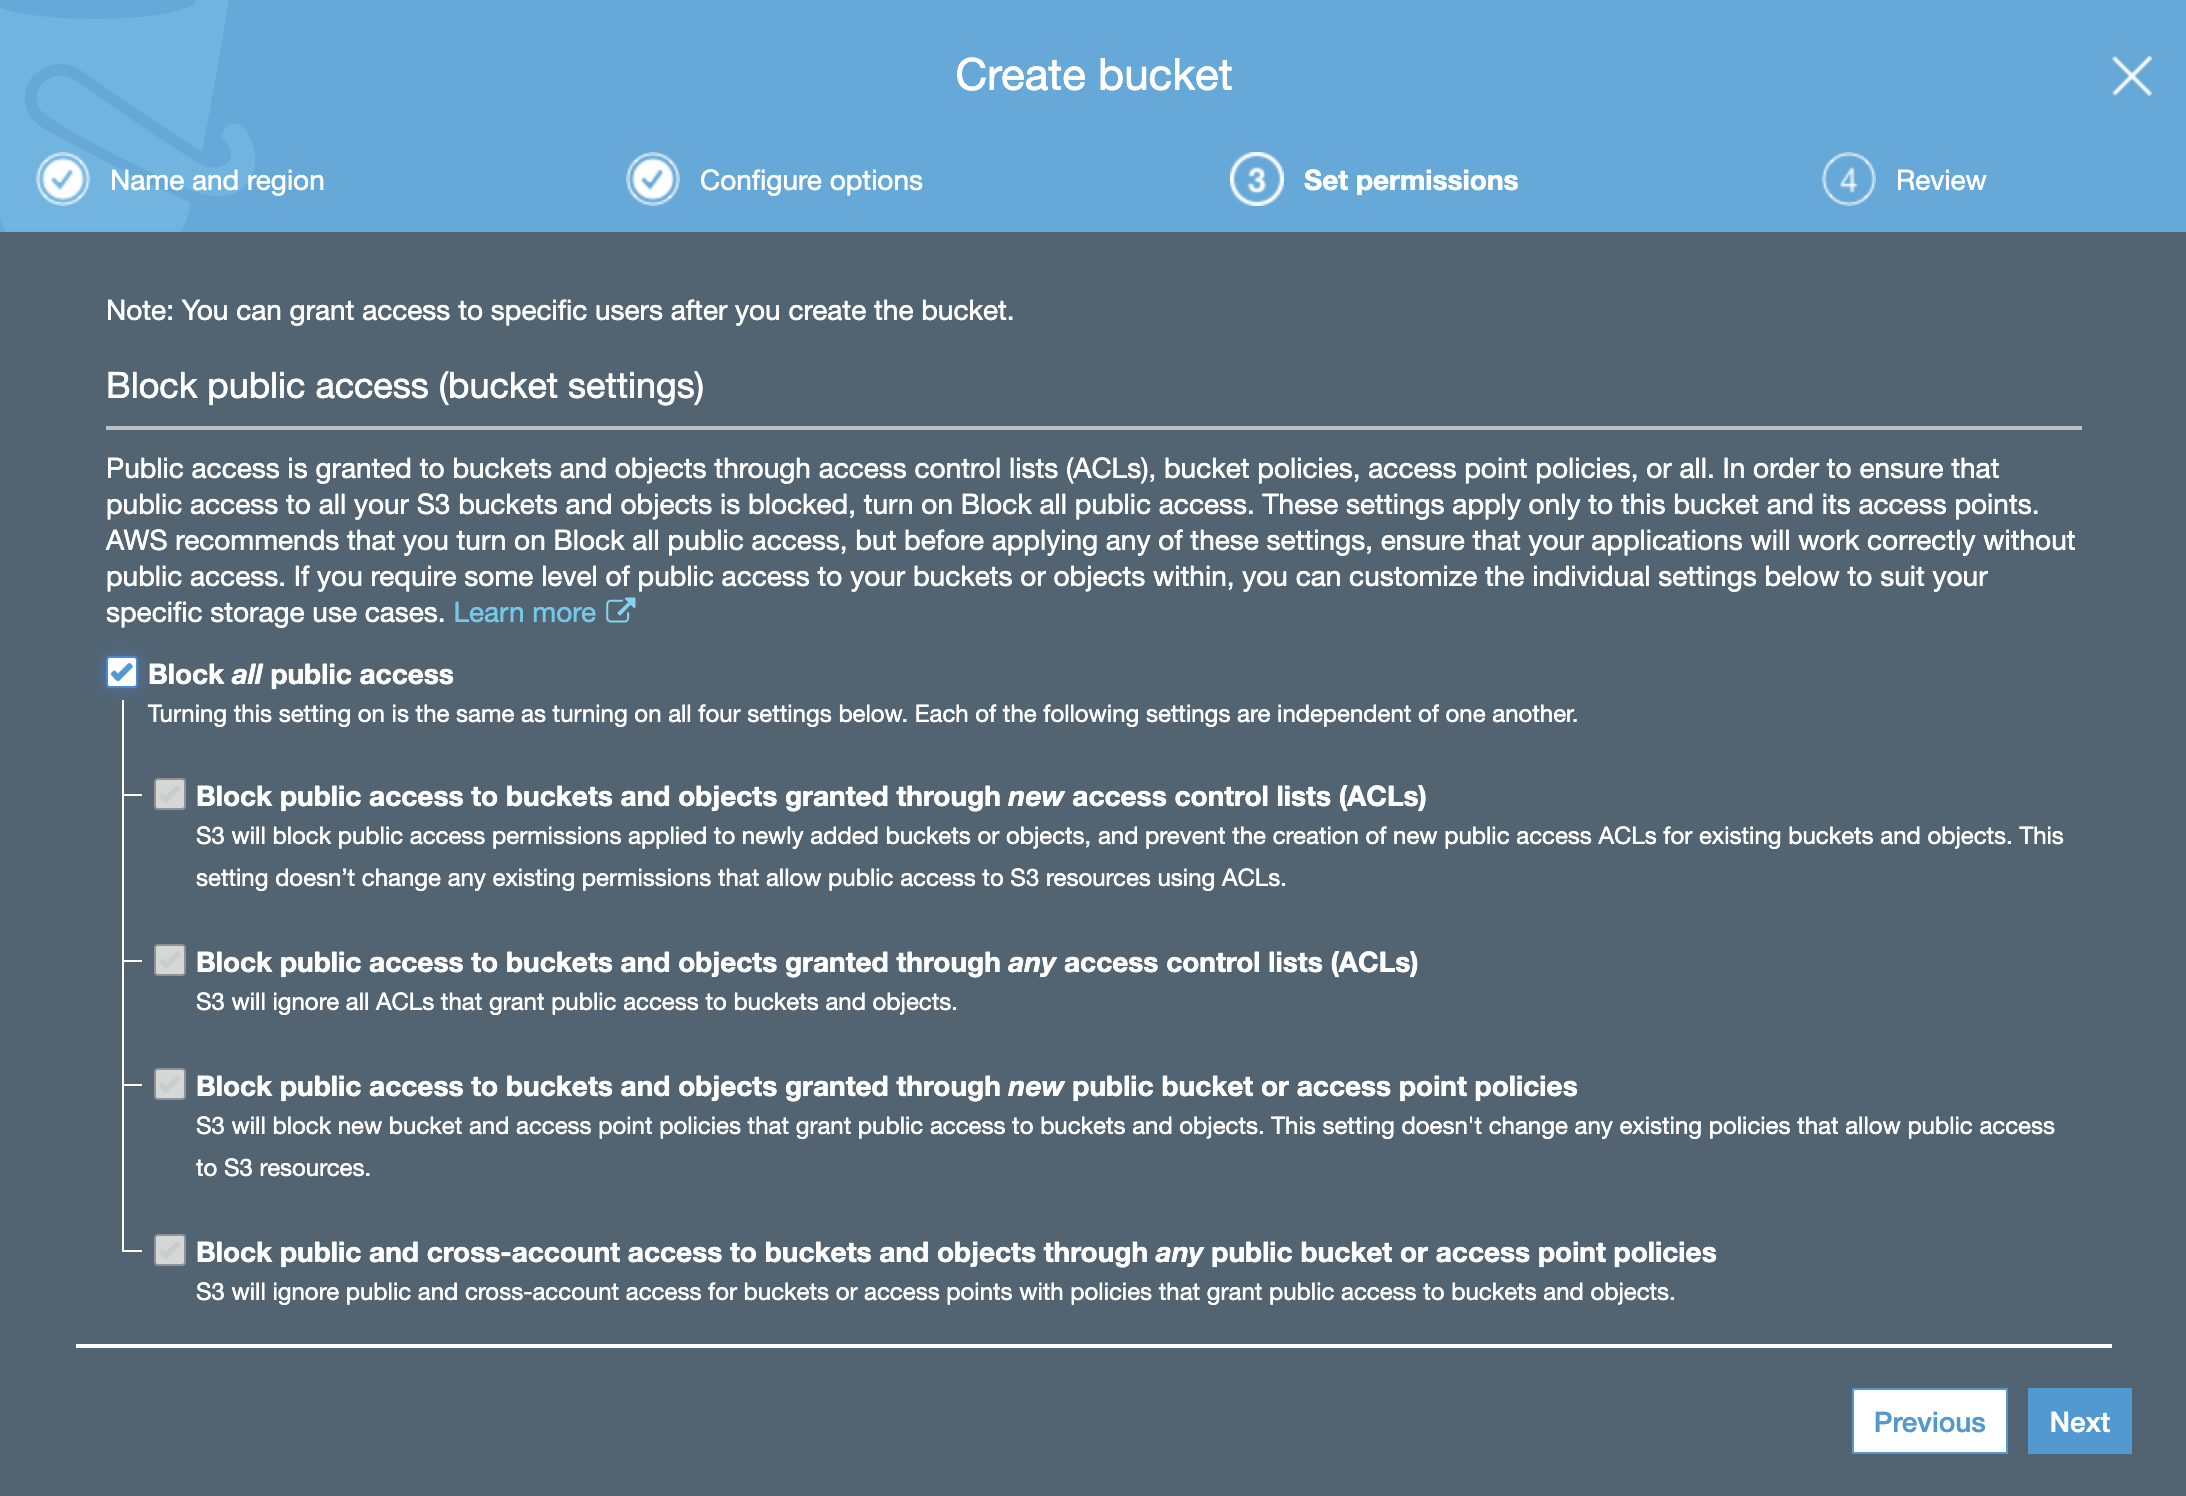
For now, accept the default Block all public access permissions; otherwise, AWS prevents you from clicking Next.
-
Click Next followed by Save. Your bucket is now created.
-
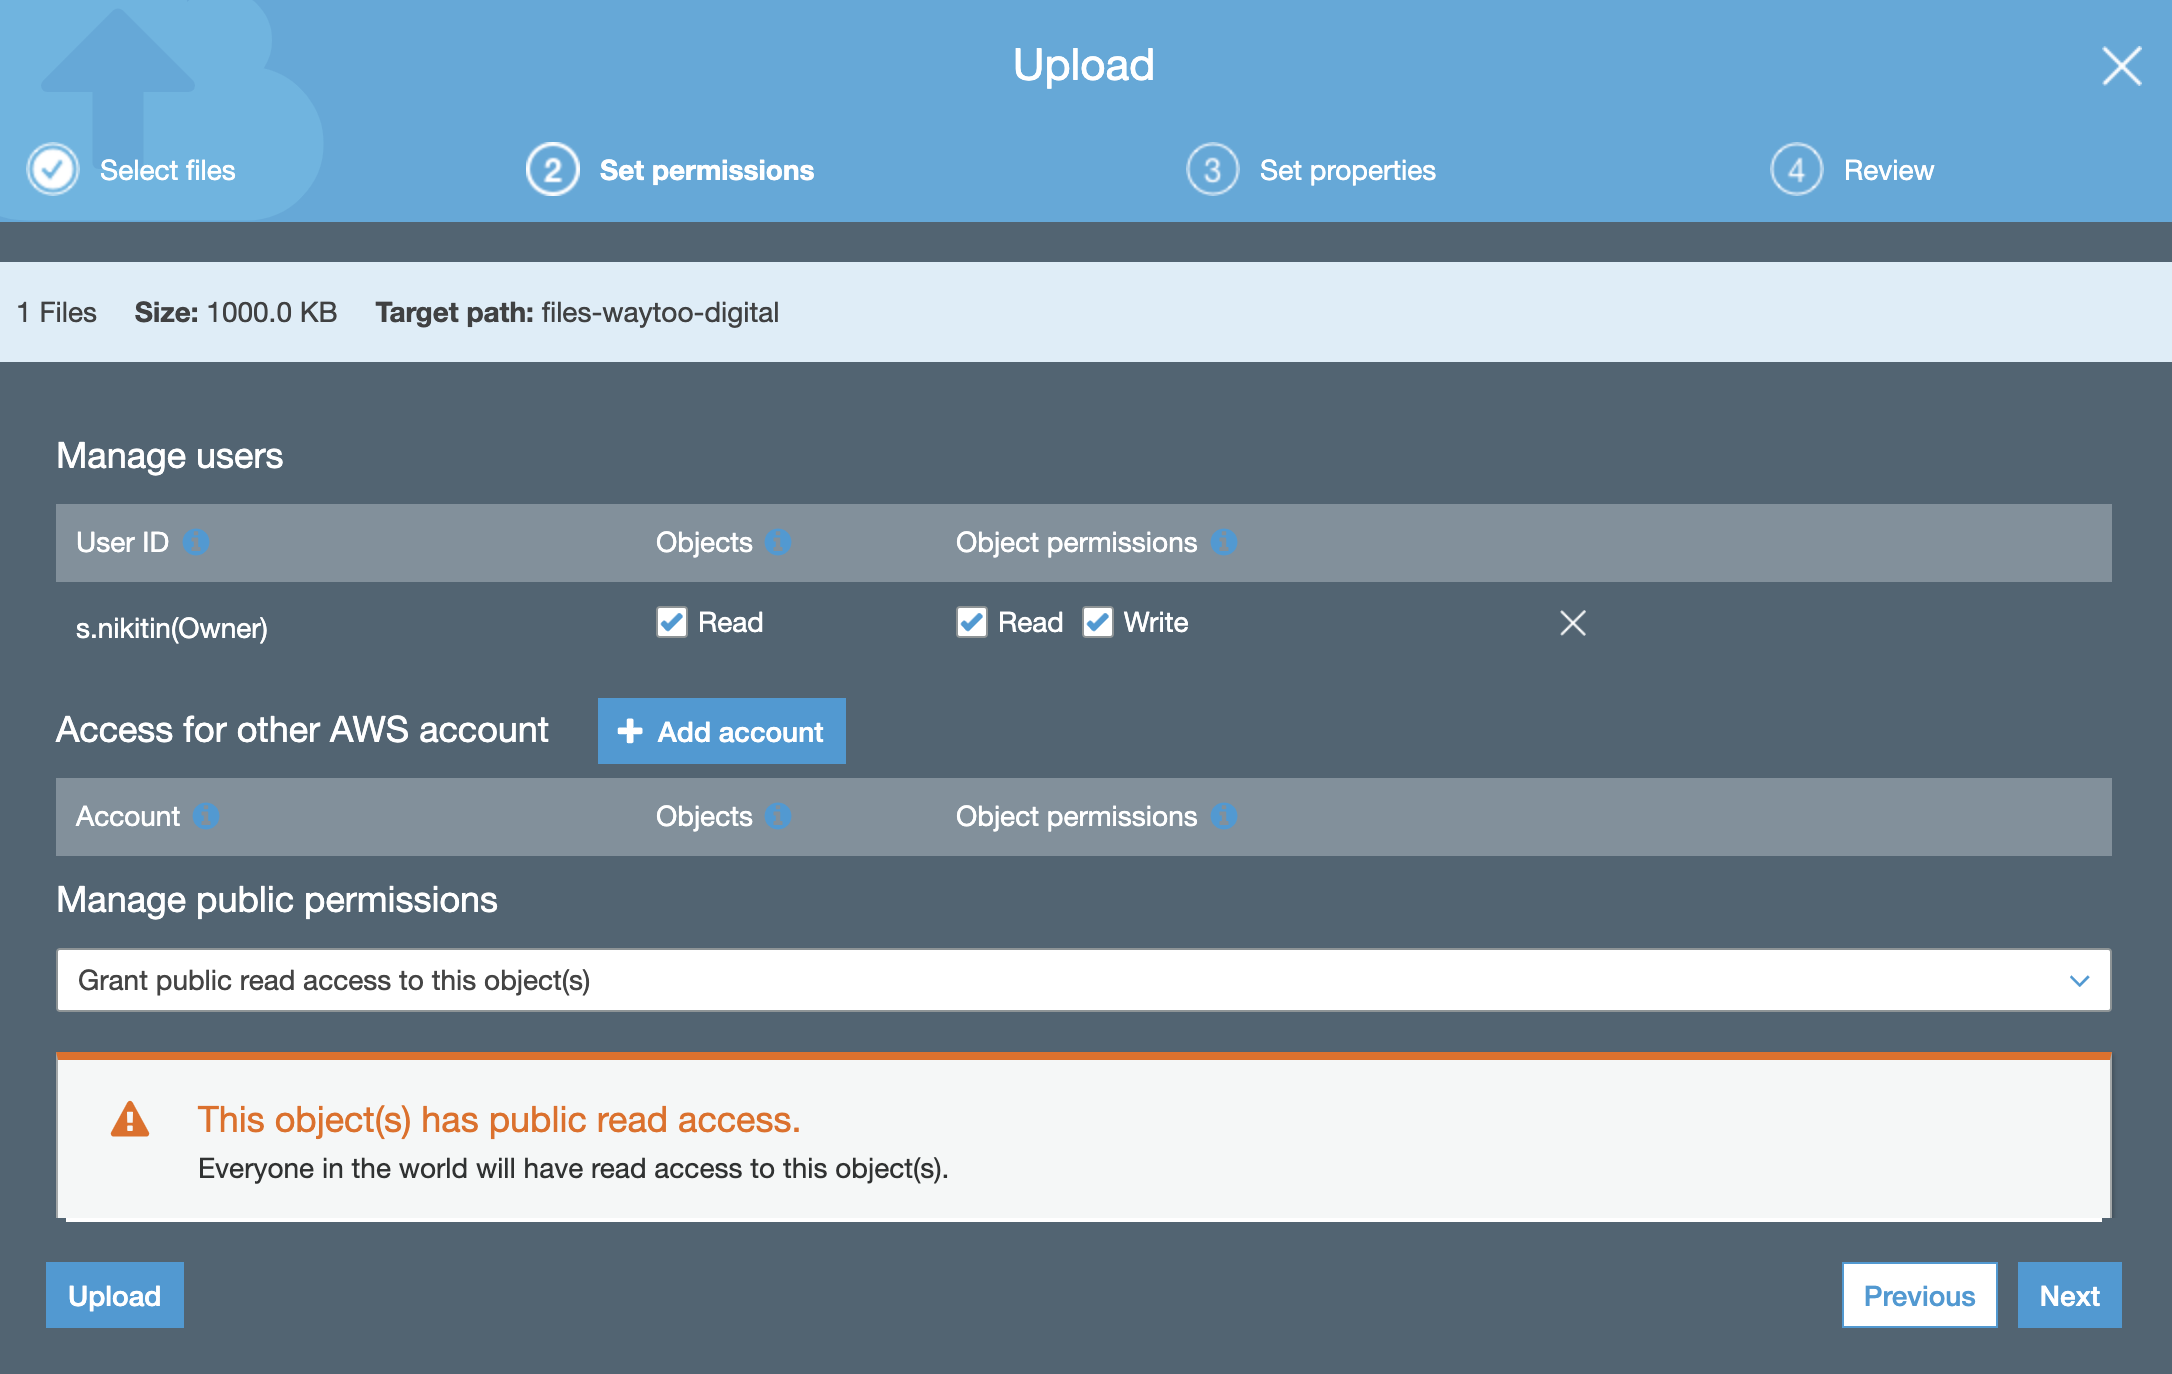
Assign appropriate permissions for accessing the bucket contents.
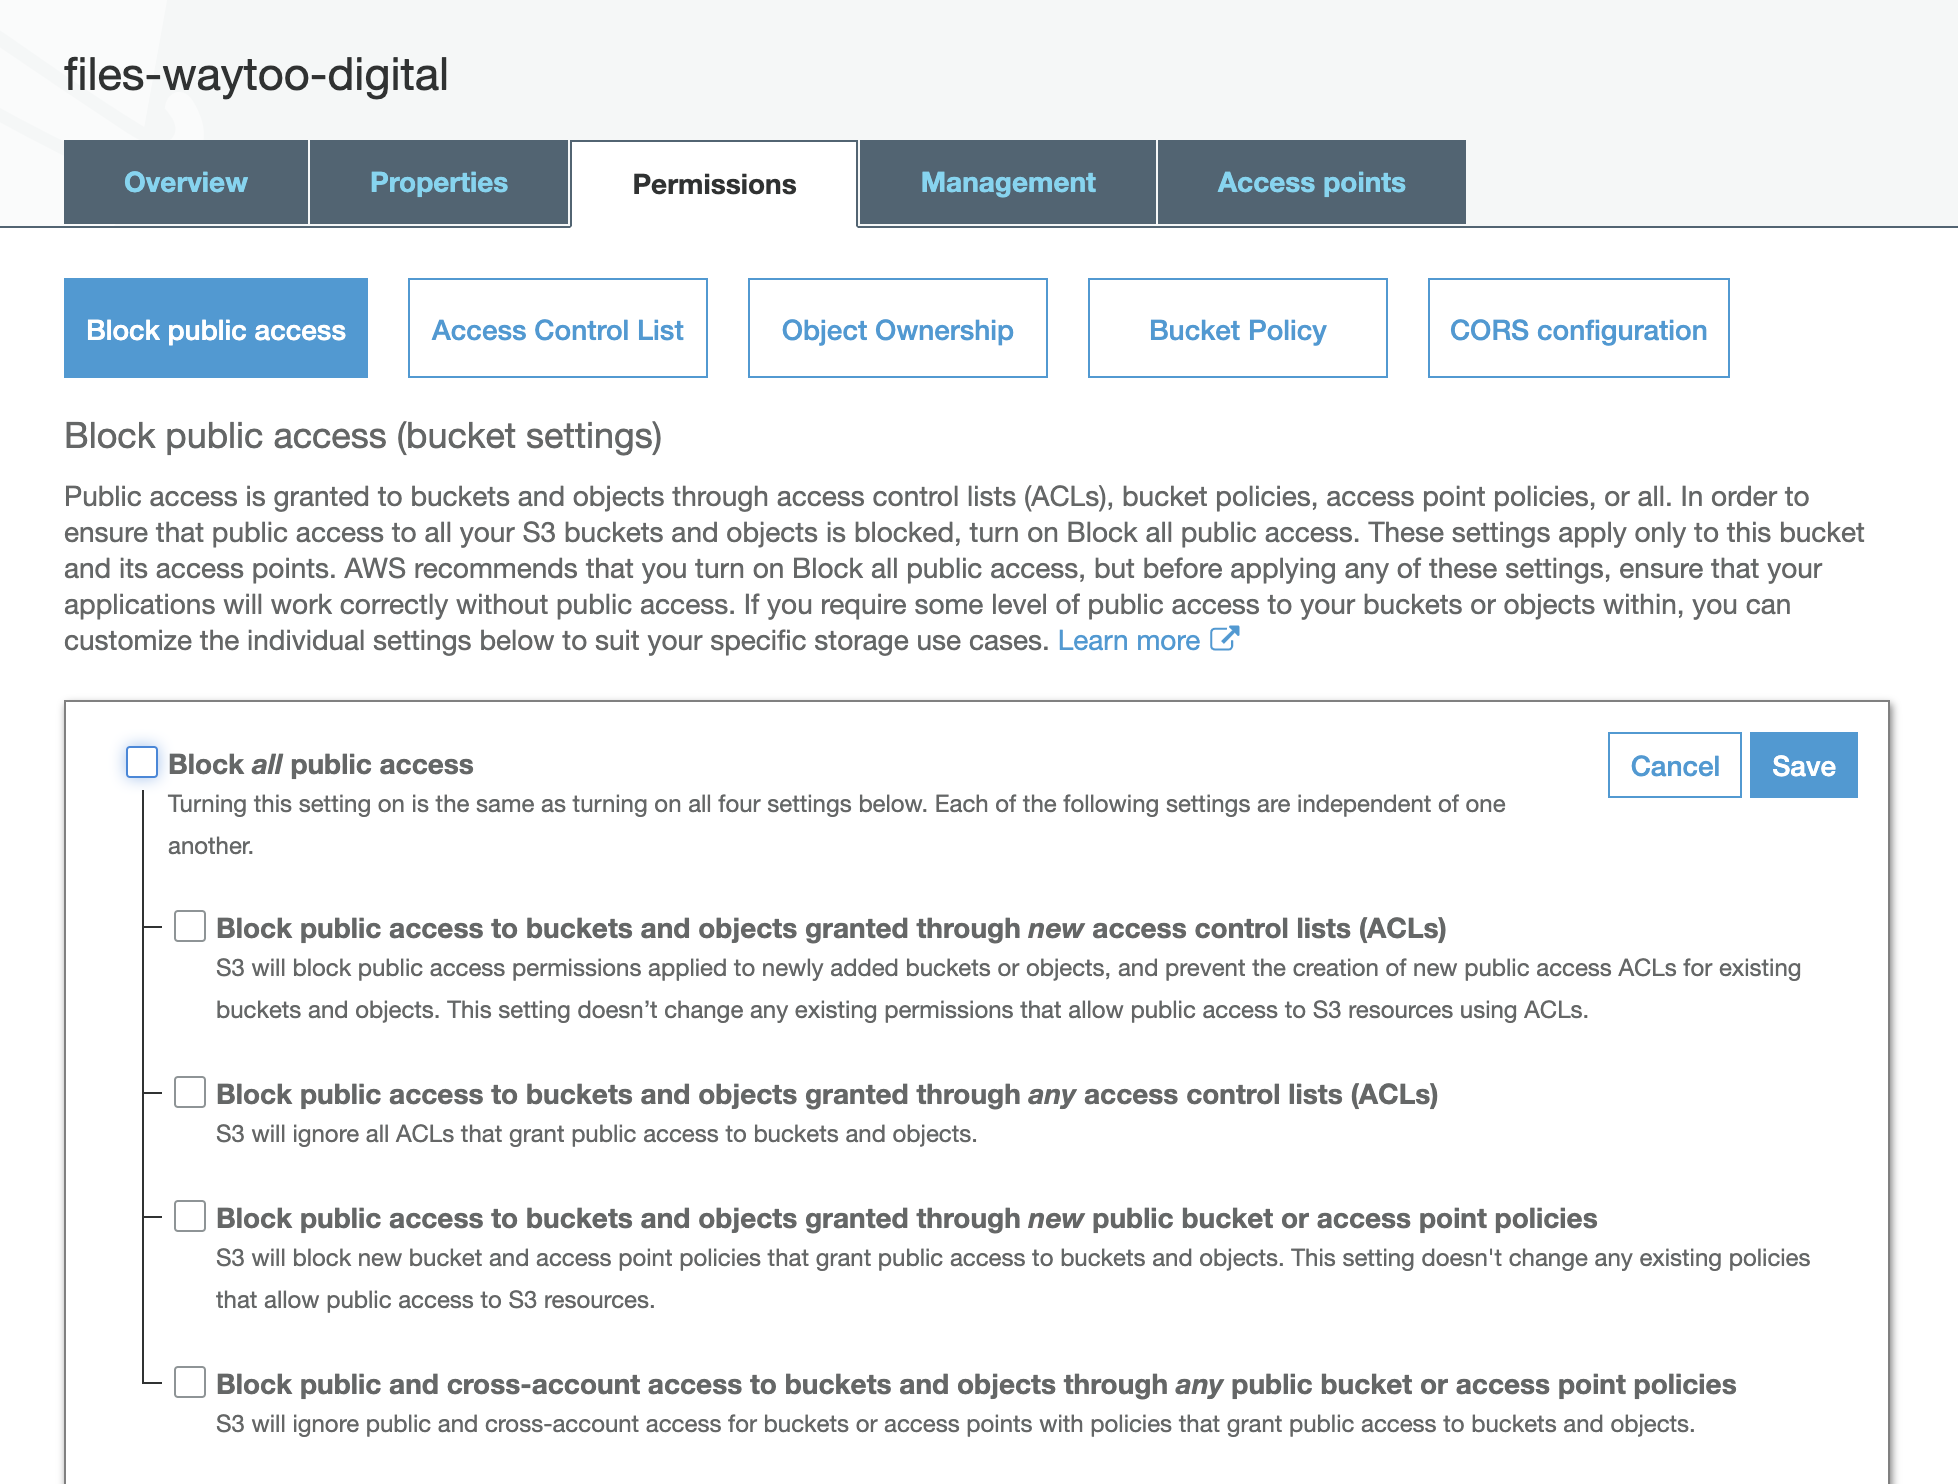
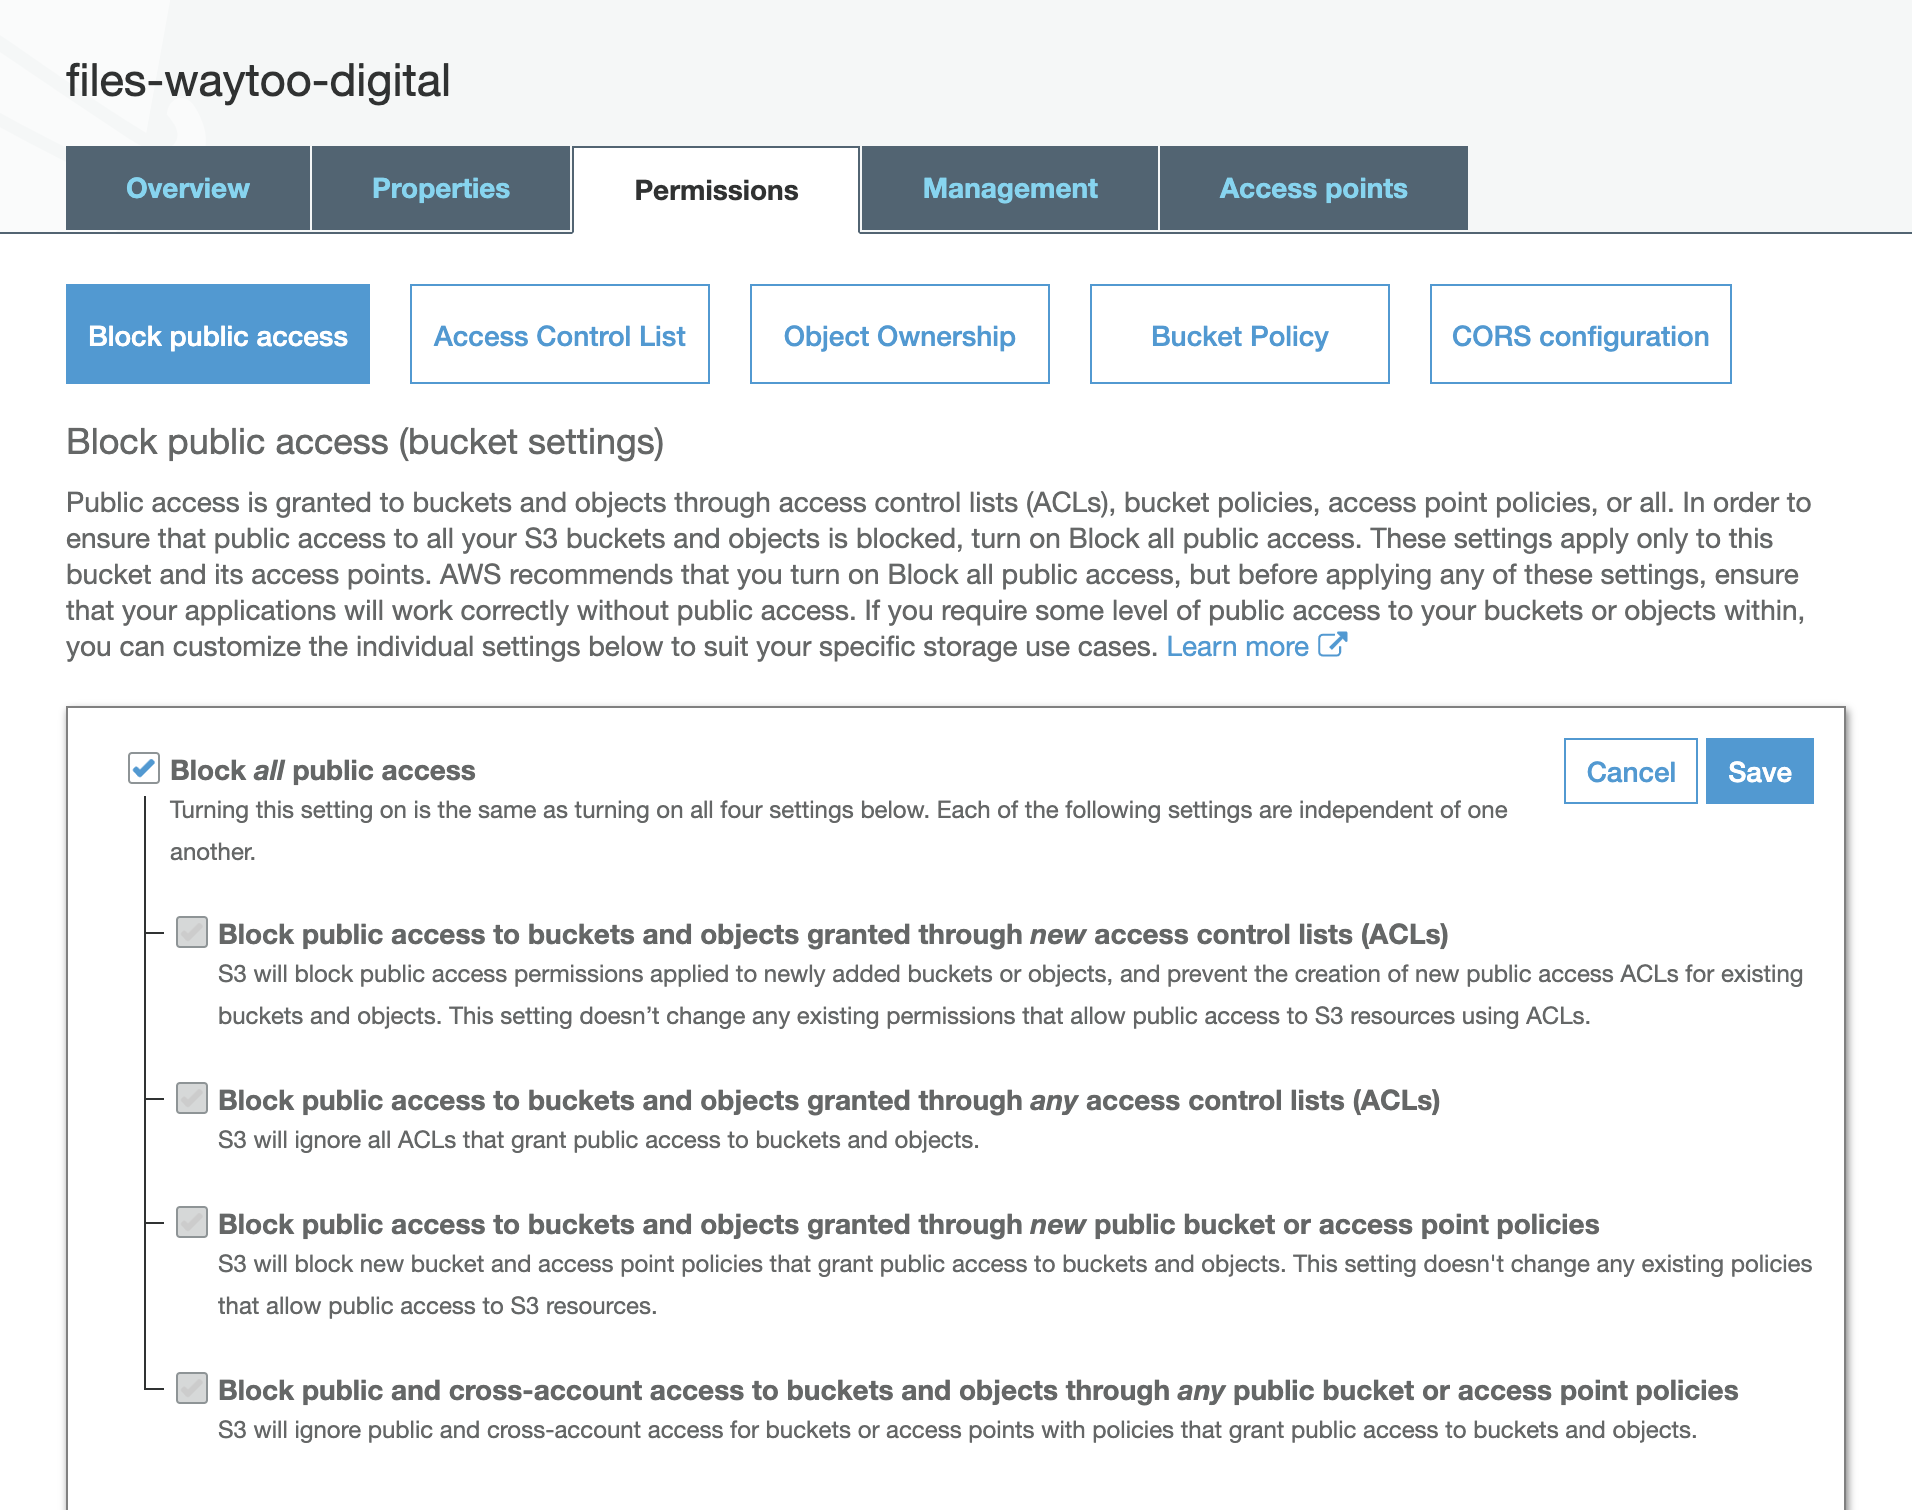
- Uncheck the Block all public access check box and click Save.
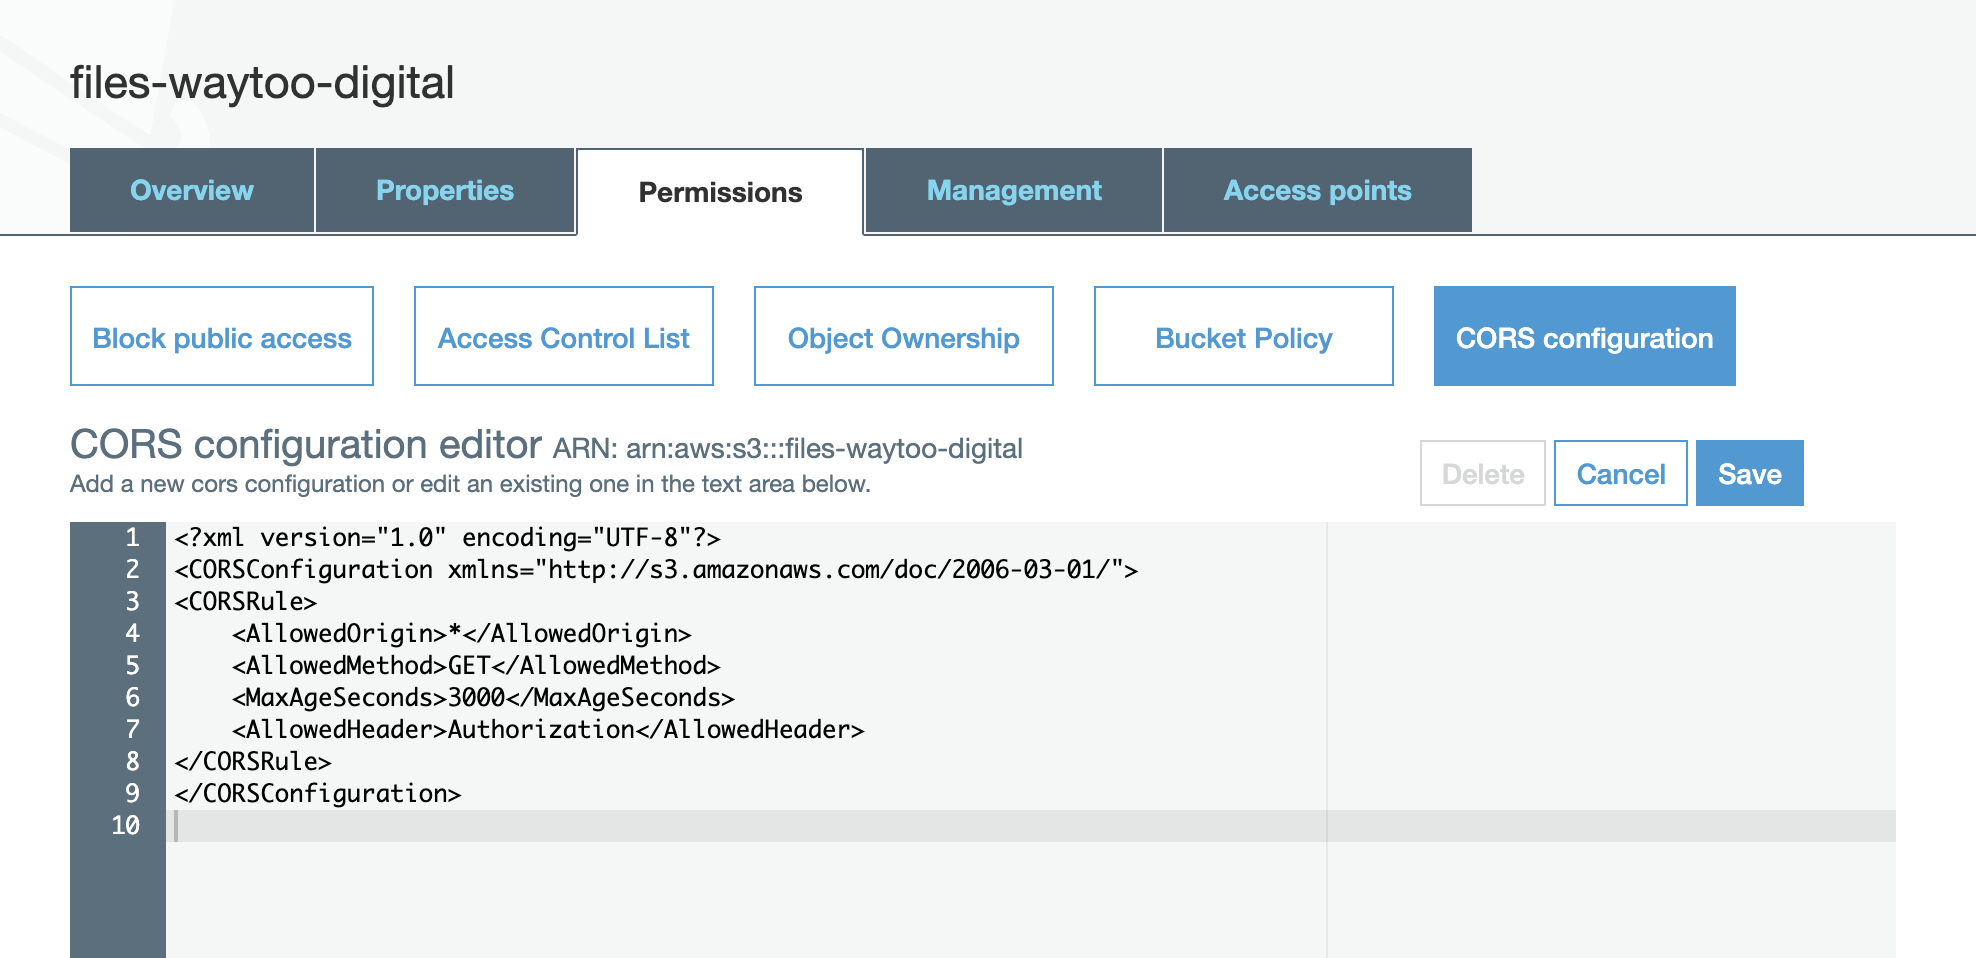
- Set up cross-origin resource sharing (CORS) by copying the following code and pasting it into the CORS configuration editor:
<?xml version="1.0" encoding="UTF-8"?>
<CORSConfiguration xmlns="http://s3.amazonaws.com/doc/2006-03-01/">
<CORSRule>
    <AllowedOrigin>*</AllowedOrigin>
    <AllowedMethod>GET</AllowedMethod>
    <MaxAgeSeconds>3000</MaxAgeSeconds>
    <AllowedHeader>Authorization</AllowedHeader>
</CORSRule>
</CORSConfiguration>
- Upload a file to the bucket to test our setup and grant public read access to the uploaded object.
- Click on the uploaded file in the bucket to check the uploaded object URL.
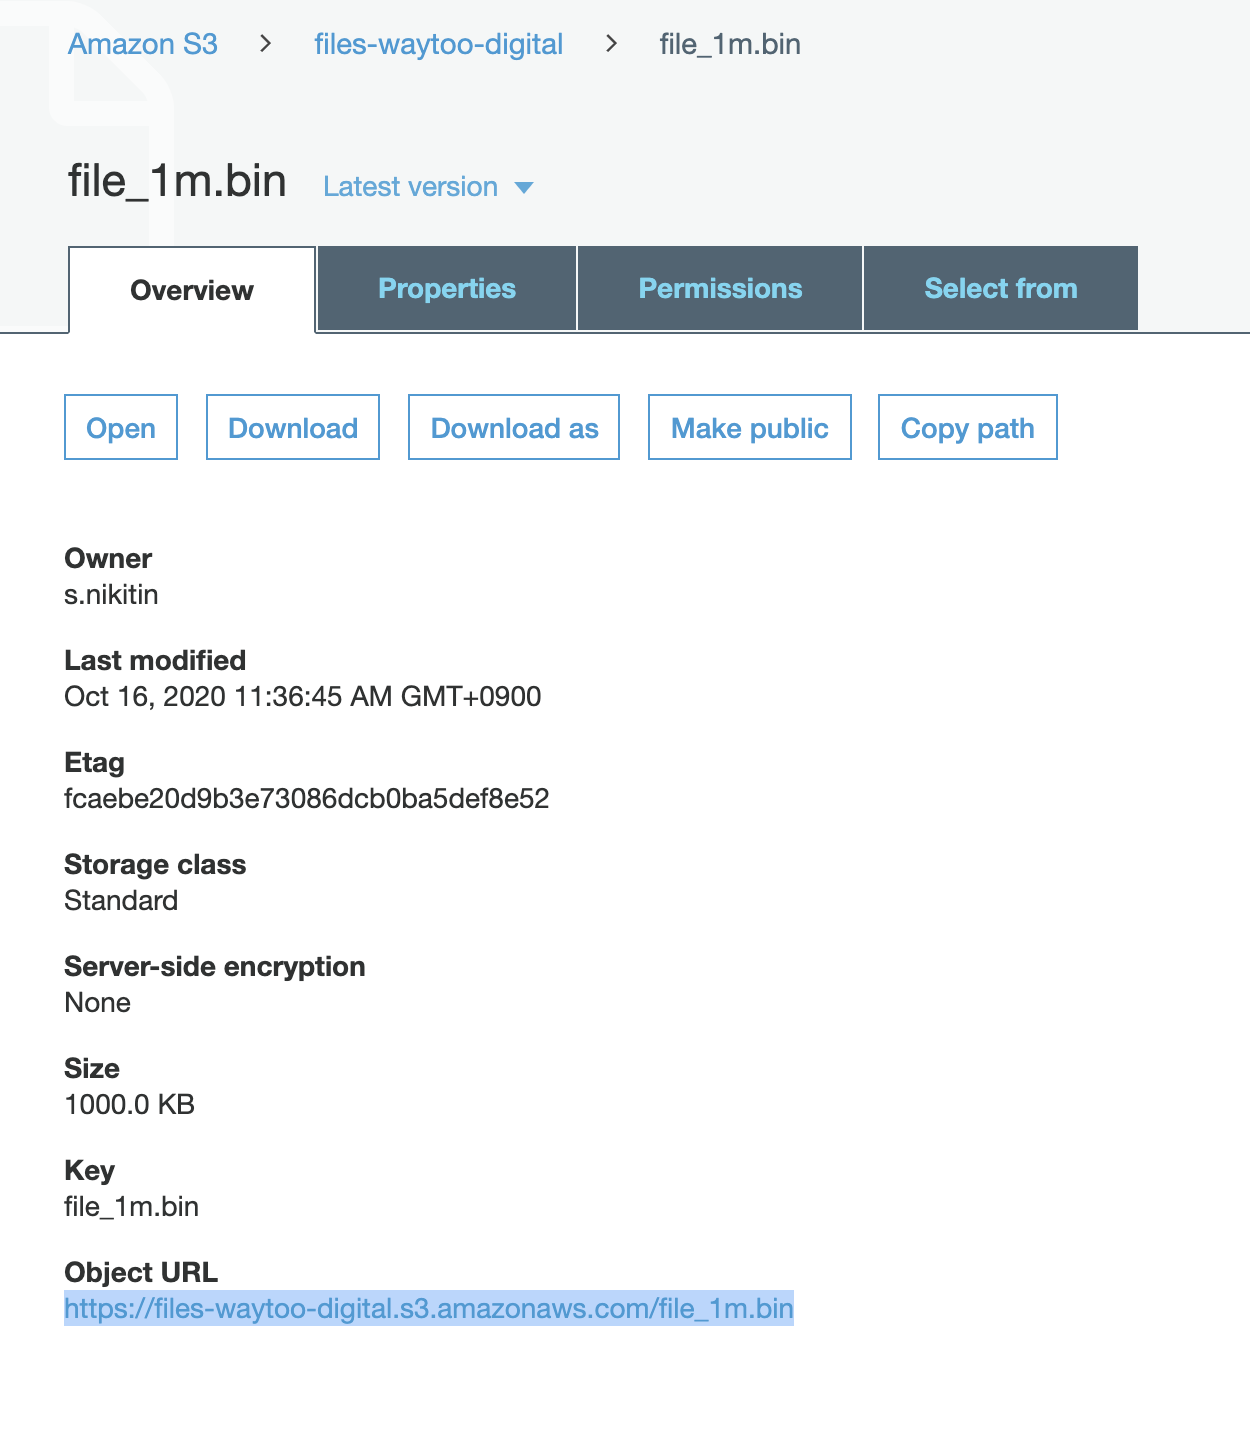
Amazon S3 uses the following URI syntax to access bucket names: <BUCKET_NAME>.<REGION>.amazonaws.com. Instead of returning the region, Amazon S3 returns s3. Regardless, we can use the bucket domain name to set up CDN Pro.
Setting Up CDN Pro
Log in to the CDN Pro management console at https://console.cdnetworks.com.
Traffic Management
- In the Traffic Management page, create an edge hostname.
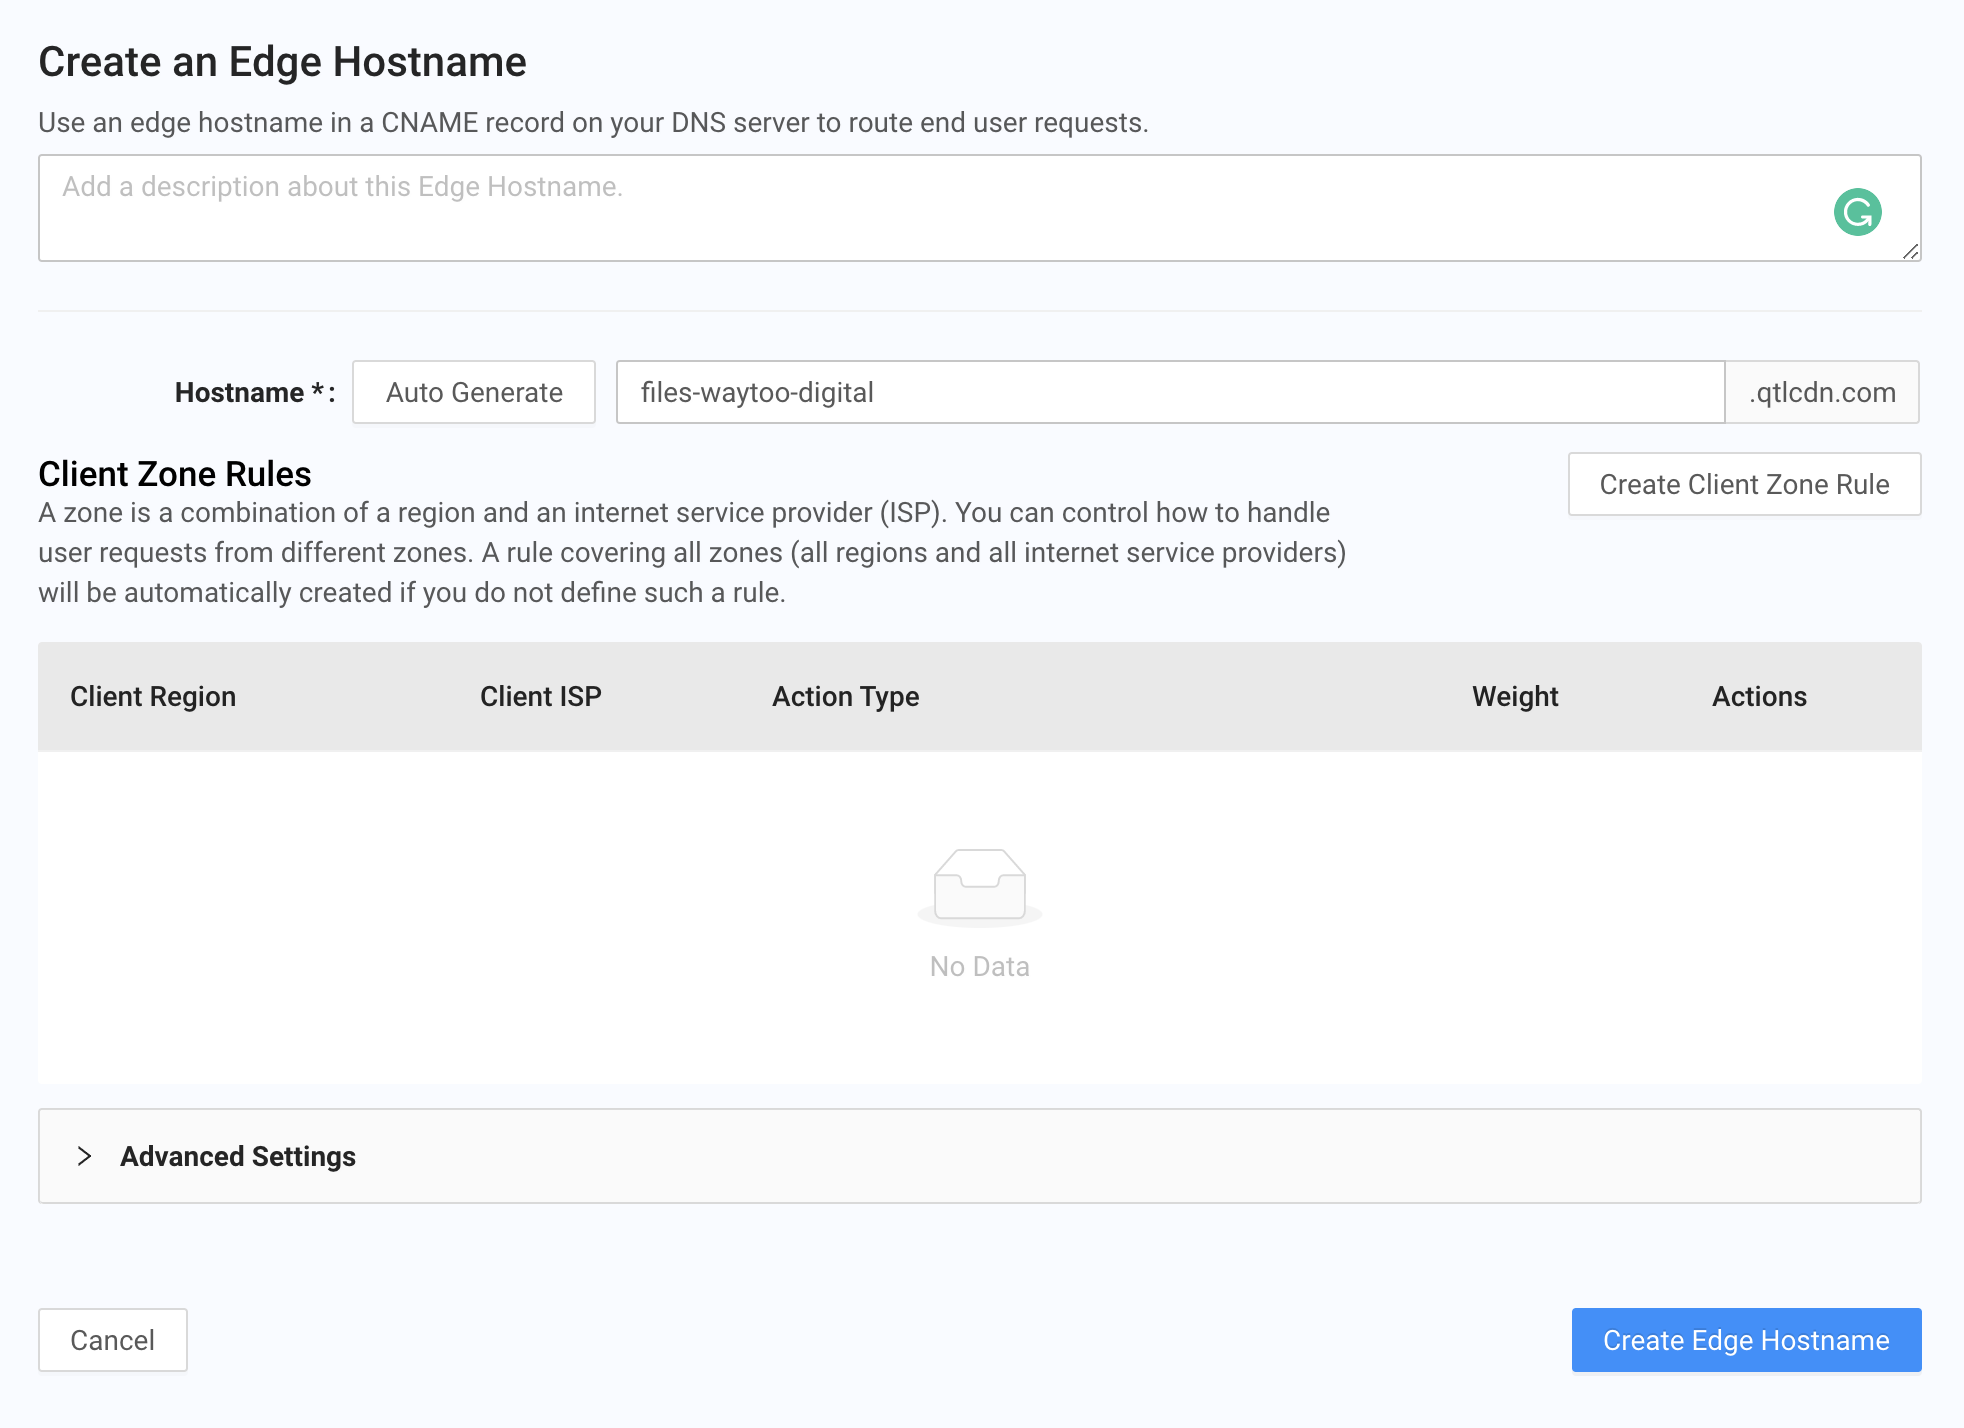
- After creating the edge hostname, access it in terminal to make sure it works:
$ping files-waytoo-digital.qtlcdn.com
PING files-waytoo-digital.qtlcdn.com (14.0.119.186): 56 data bytes
64 bytes from 14.0.119.186: icmp_seq=0 ttl=56 time=3.775 ms
64 bytes from 14.0.119.186: icmp_seq=1 ttl=56 time=3.953 ms
64 bytes from 14.0.119.186: icmp_seq=2 ttl=56 time=3.739 ms
64 bytes from 14.0.119.186: icmp_seq=3 ttl=56 time=4.733 ms
Server Certificates
Now let's generate a server certificate and renew it automatically with Let’s Encrypt.
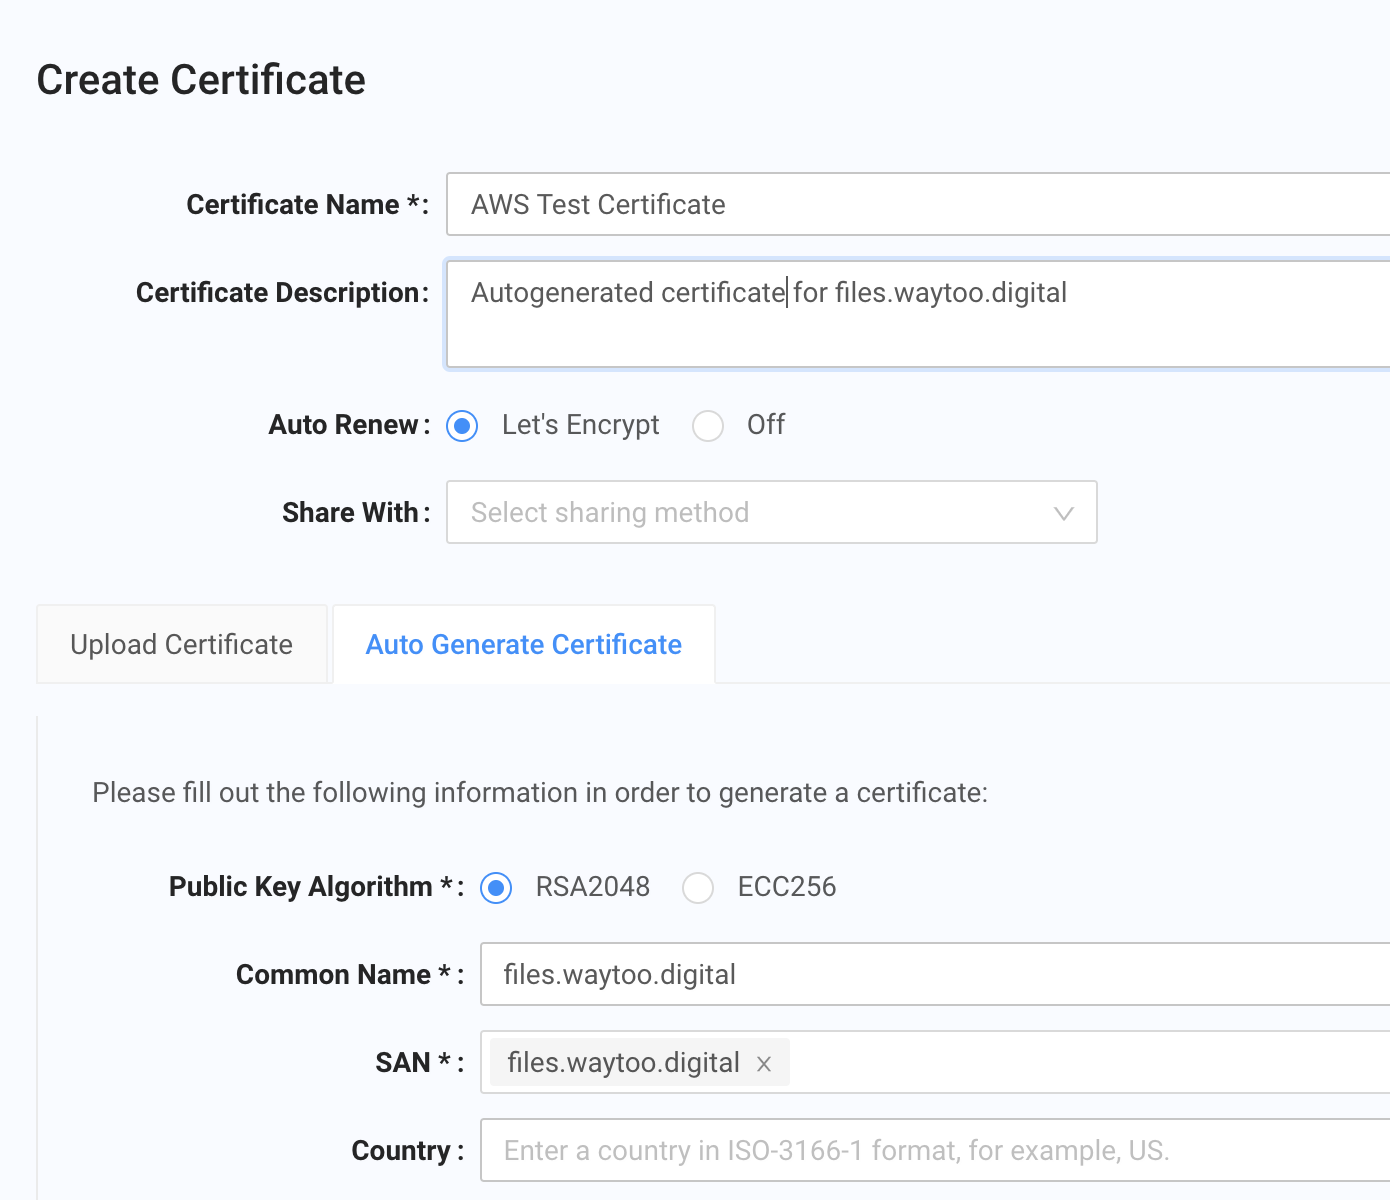
- Click Certificates and choose Server Certificates. In the Certificates page, click Create Certificate.
- Complete the Certificate Name and Certificate Description fields.
- Set Auto Renew to Let’s Encrypt.
- Click the "Auto Generate Certificate" tab, and then enter files.waytoo.digital in the Common Name and SAN fields.
- Click Save Certificate to save the settings.
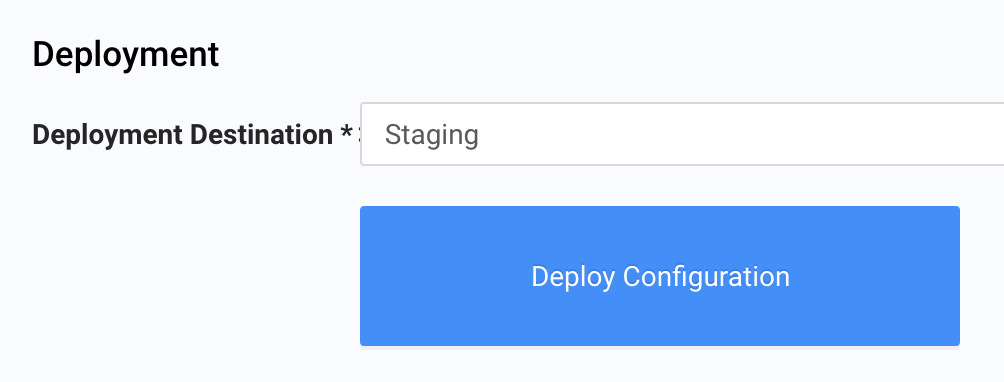
Deploy a Certificate to the Staging Environment
Because we saved the server certificate earlier, we can now deploy it. To make sure the certificate meets our needs, we are going to deploy it to a staging environment to test our setup before releasing the certificate to production.
Edge Configurations
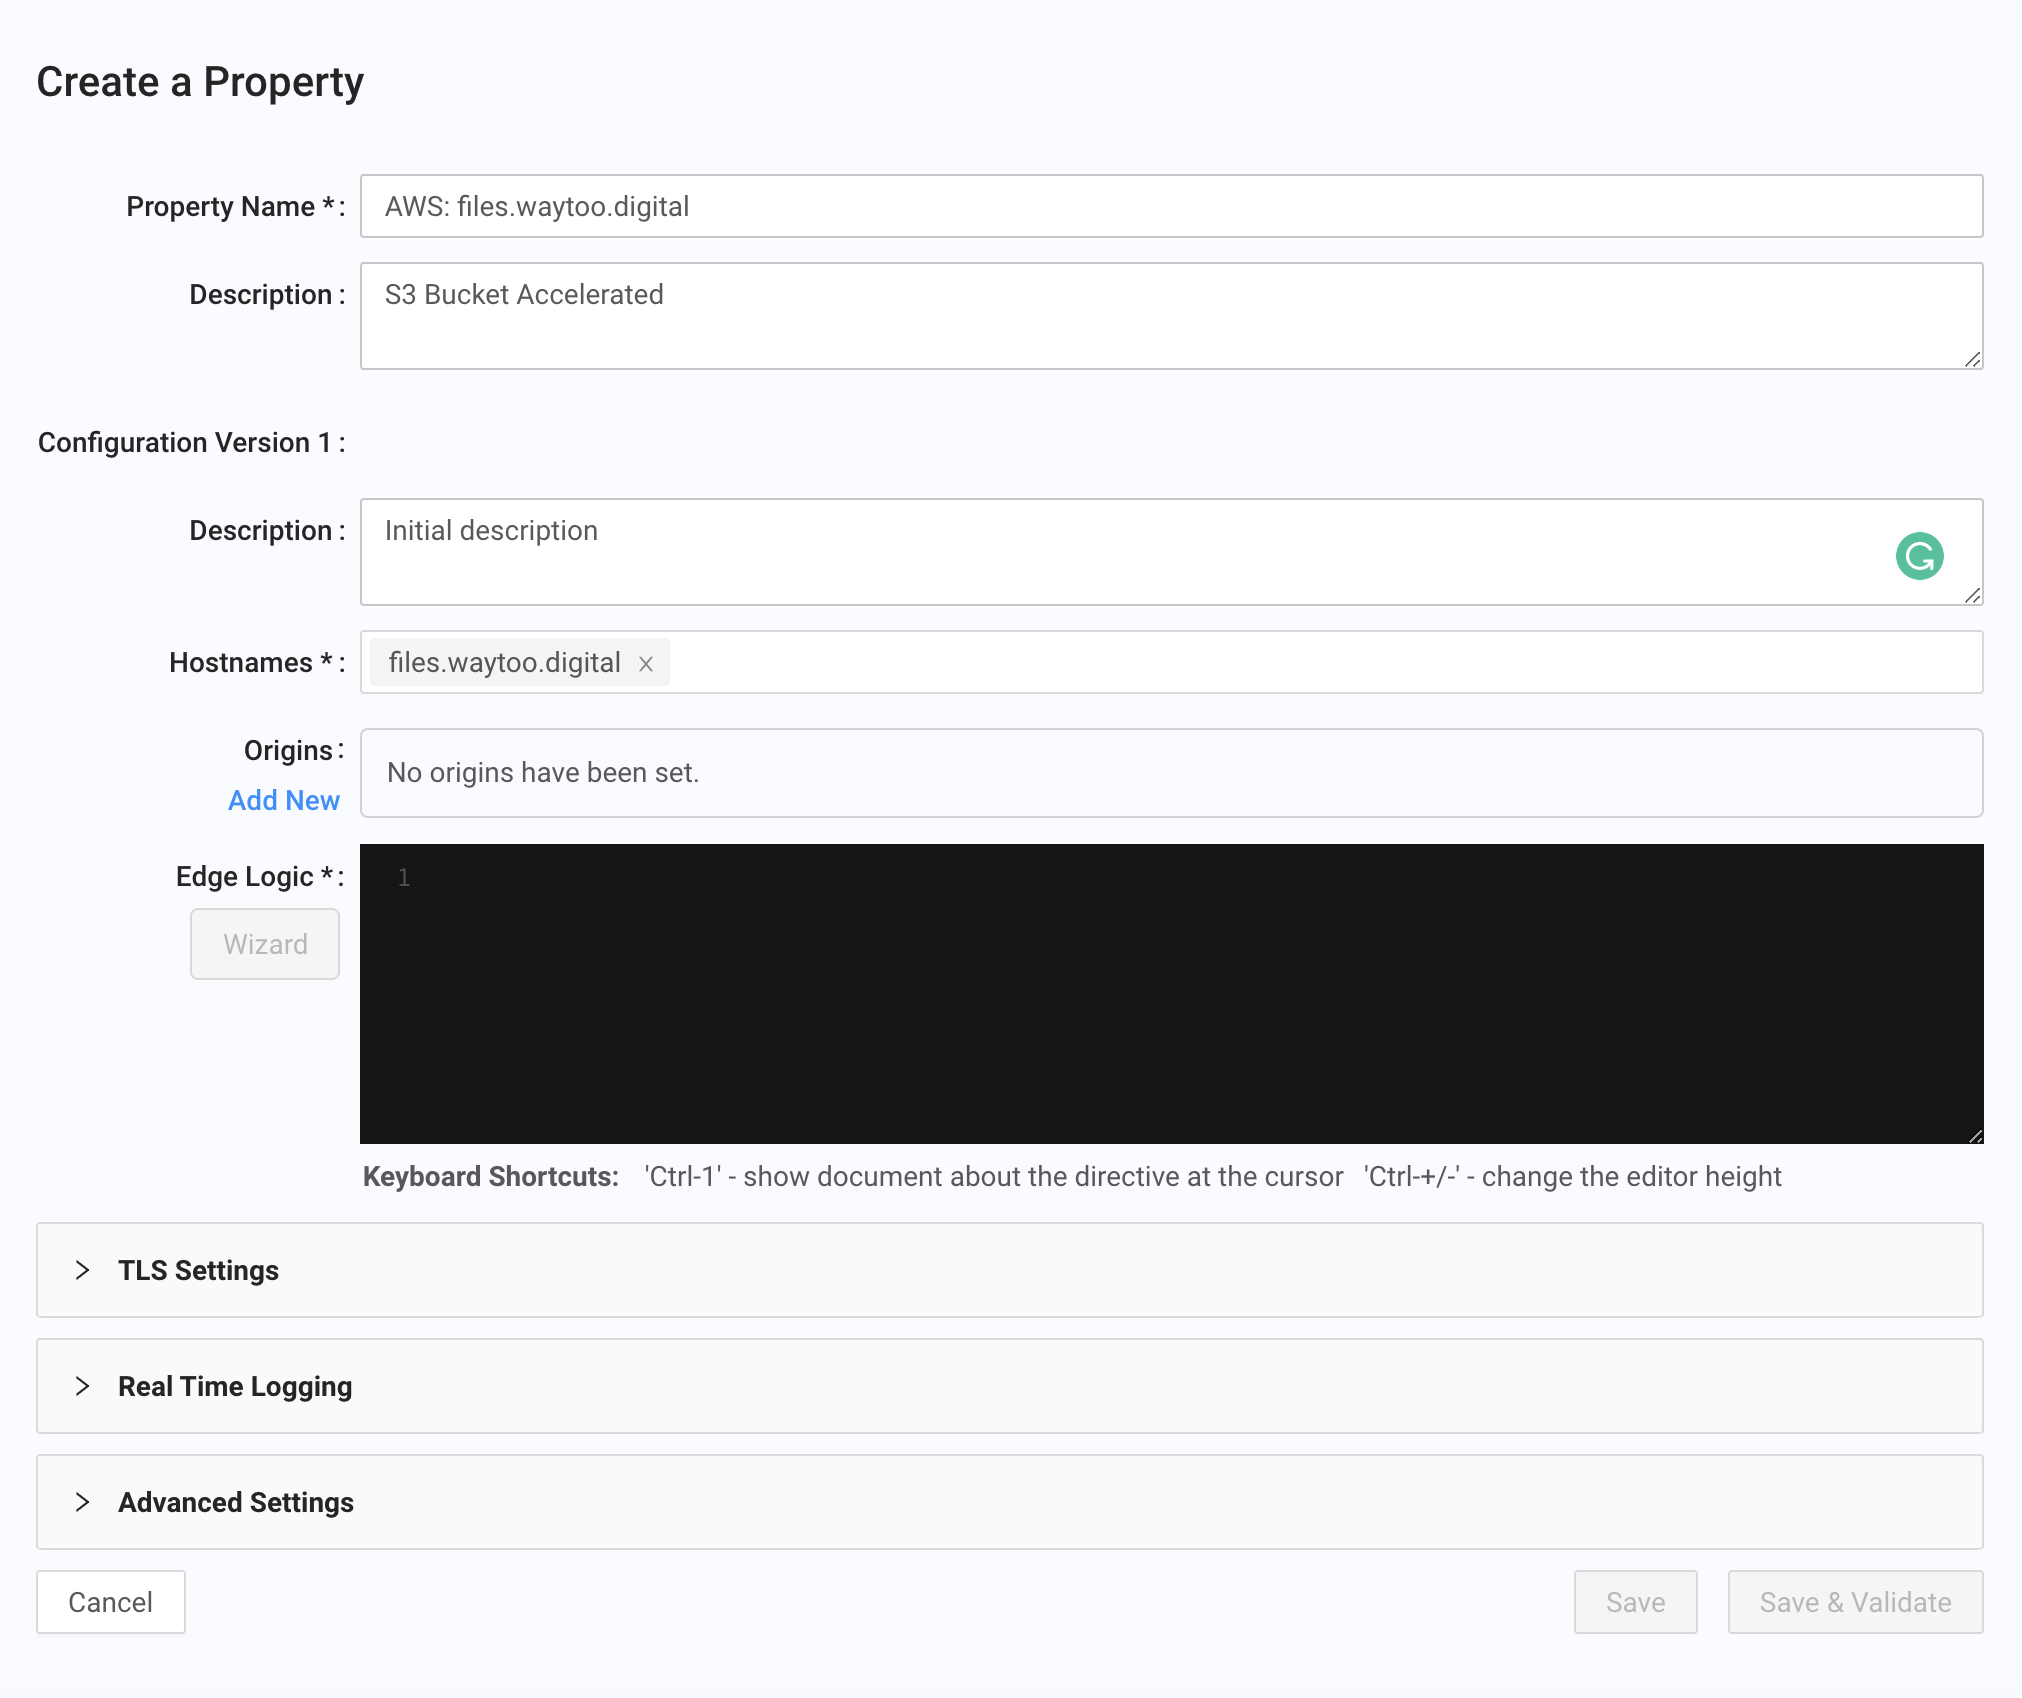
- In the Edge Configurations page, click Create Property.
-
Enter the Property Name, an optional Description for the property, and a Description of the configuration version.
-
Enter at least one hostname in the Hostnames field. The cache identifies and handles requests for property configurations by matching the request header
Hostvalue with Hostnames field values. -
Under Origins, click Add New to add our S3 bucket as the origin.
-
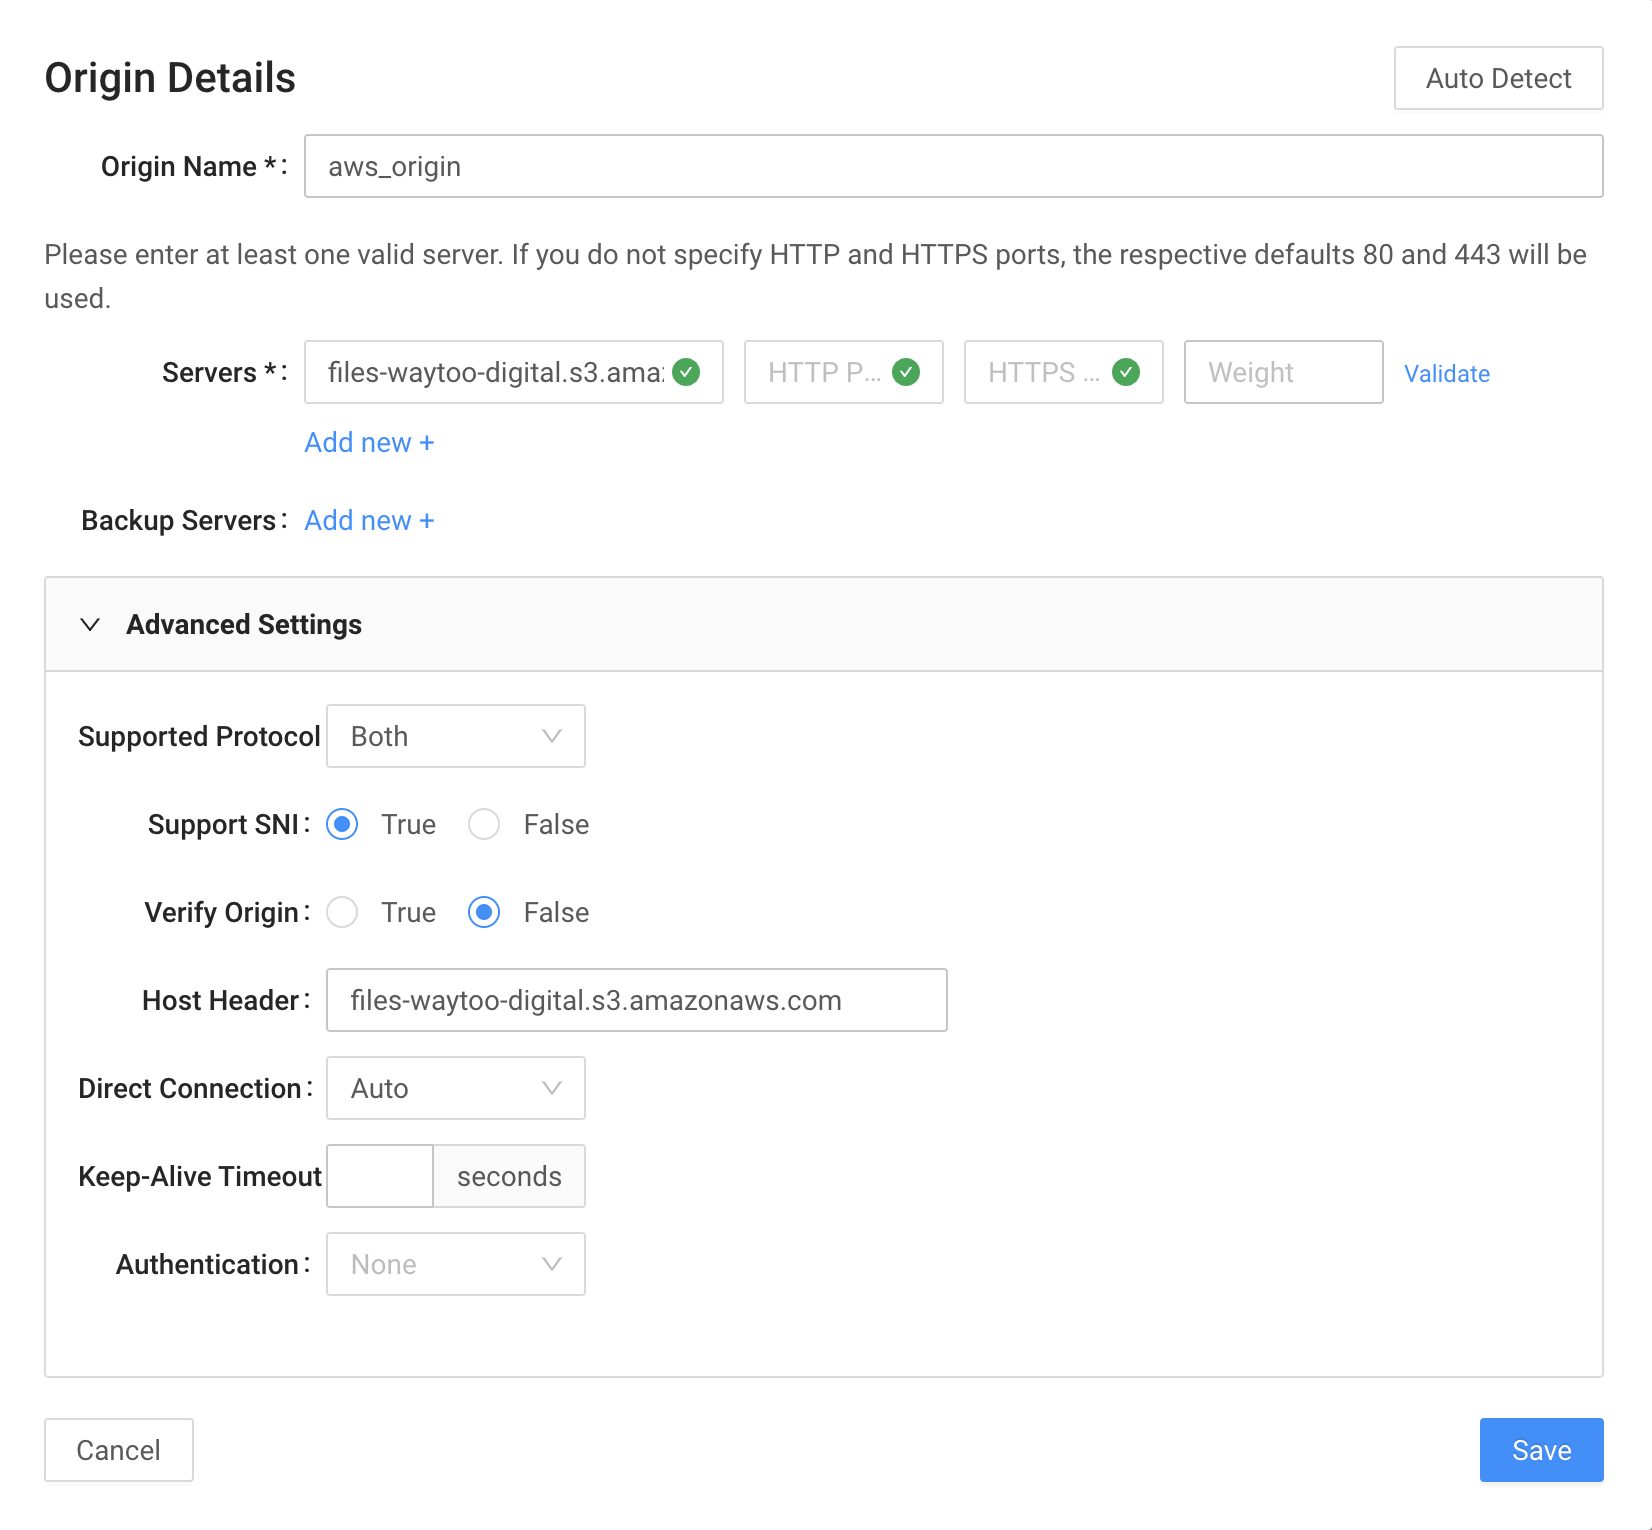
Origin name will be used in the Edge Logic script (in our example, it's called
aws_origin). In the Servers field, add our S3 bucket domain:files-waytoo-digital.s3.amazonaws.com. -
Click Validate to make sure everything is satisfactory.
-
Expand Advanced Settings, and then enter the origin hostname
files-waytoo-digital.s3.amazonaws.comin the Host Header field. This value will be set asHostin the request header between the Edge and the Origin. This is an important step because if it is omitted, the Host's value will befiles.waytoo.digitaland Amazon S3 will respond with aBucket not founderror. -
Click Save.
We have created an origin. Next we will create an initial Edge Logic configuration.
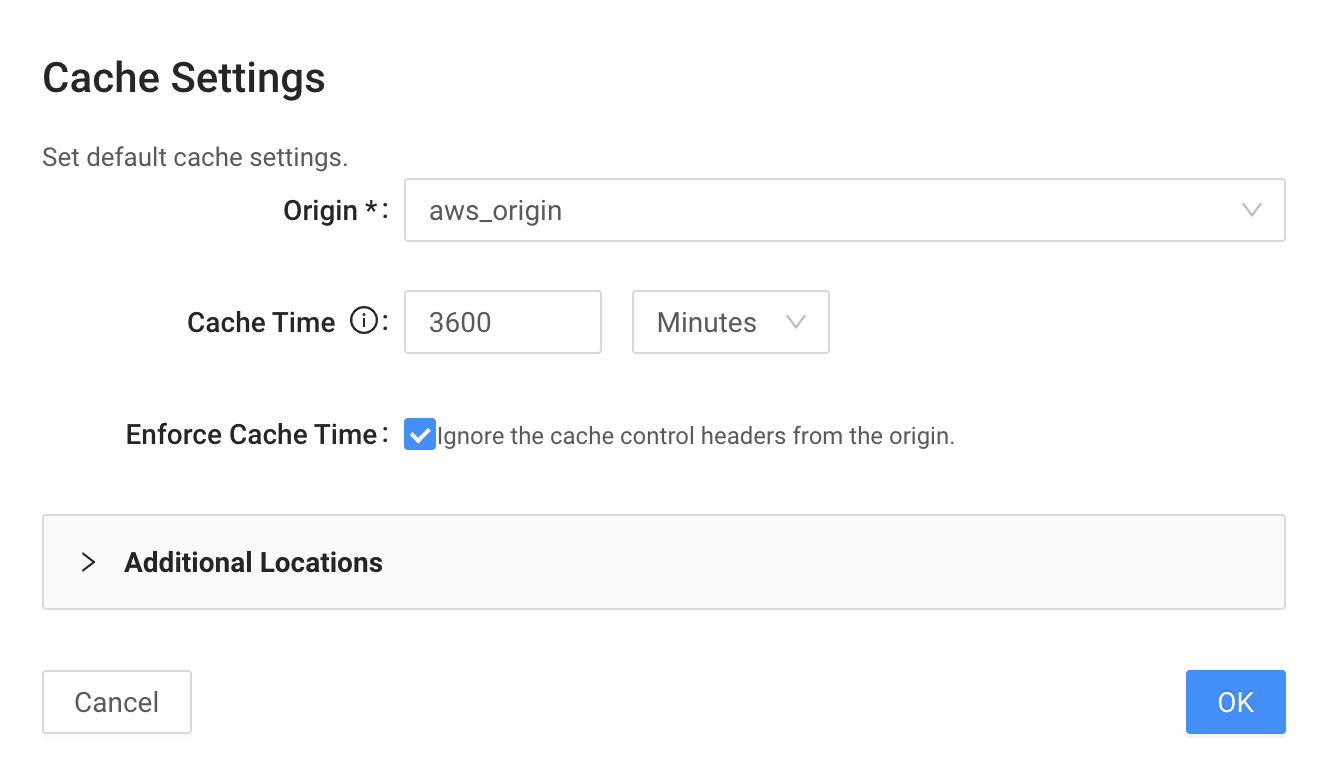
- Click the Wizard button.
-
Select the previously configured origin, set cache time to 3600 minutes, and ignore cache-control headers from origin to handle cache behavior on the edge.
-
Click "OK". The system generates the following Edge Logic script:
       location / { #This is the default location.
           origin_pass aws_origin;
           proxy_cache_valid 3600m; #200, 301, and 302 responses will be cached for 3600m
           proxy_ignore_headers Cache-Control Expires; #This will force the cache server to ignore cache control headers from origin.
       }
You can edit this script and set up any logic you need to address your requirements.
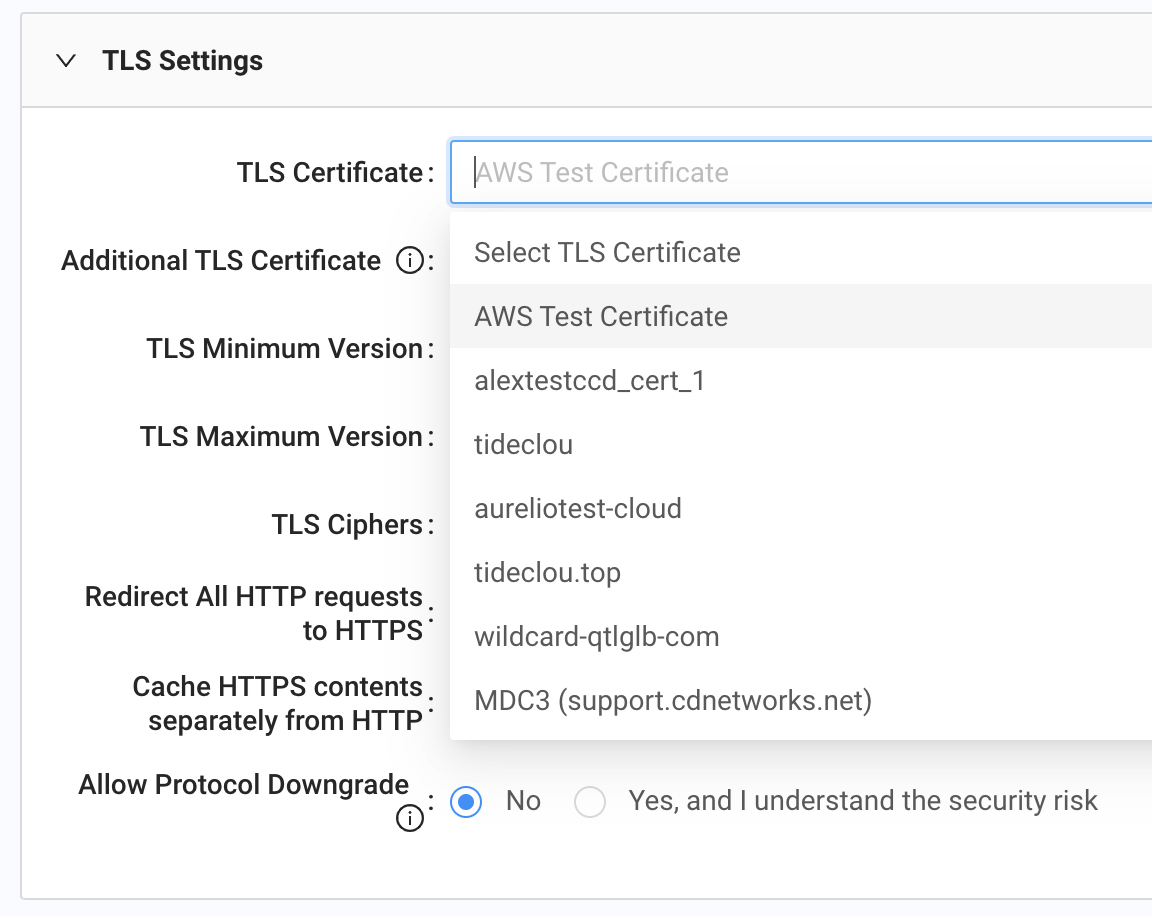
In our example, we have everything we need for this property, except for one thing: the server certificate we want to add.
- Expand the TLS Settings tab. In the TLS Certificate field, enter the name of the certificate we created and deployed to staging.
Assuming that no issues occurred after saving and validating, you can now deploy the property to the staging environment for testing.
Testing (Staging)
To test staging deployments, you should know the IP addresses of the staging server:
$ dig staging.qtlgslb.com
...
;; ANSWER SECTION:
staging.qtlgslb.com.    59  IN  A   163.171.228.89
staging.qtlgslb.com.    59  IN  A   163.171.230.47
...
Pick one of the returned IP addresses, and check whether everything we set up and deployed works properly.
❯ curl -I https://files.waytoo.digital/file_1m.bin --resolve files.waytoo.digital:443:163.171.228.89
HTTP/2 200
content-type: application/octet-stream
content-length: 1024000
x-amz-id-2: eQa0SXtgPk3A+jASSyarZLw6FgFtXg+7m+Br6Xr/YBXQ0aot/dBTKBf5QSoE0x8TwzqBKXJ+MBw=
x-amz-request-id: 4Z0SEN8YER8PBYAG
date: Fri, 16 Oct 2020 03:30:16 GMT
last-modified: Fri, 16 Oct 2020 02:36:45 GMT
etag: "fcaebe20d9b3e73086dcb0ba5def8e52"
x-cache-status: MISS
x-qtl-request-id: 4c394e8fd8cc514c5f1e437ac3daf969
x-via: 2.0 na-us-iad1-cache-0003 [MISS 200]
age: 19
server: QTL_Cache/1.2.03
accept-ranges: bytes
By requesting the same item again, we will see that the cache status is HIT.
❯ curl -I https://files.waytoo.digital/file_1m.bin --resolve files.waytoo.digital:443:163.171.228.89
HTTP/2 200
content-type: application/octet-stream
content-length: 1024000
x-amz-id-2: eQa0SXtgPk3A+jASSyarZLw6FgFtXg+7m+Br6Xr/YBXQ0aot/dBTKBf5QSoE0x8TwzqBKXJ+MBw=
x-amz-request-id: 4Z0SEN8YER8PBYAG
date: Fri, 16 Oct 2020 03:30:16 GMT
last-modified: Fri, 16 Oct 2020 02:36:45 GMT
etag: "fcaebe20d9b3e73086dcb0ba5def8e52"
x-cache-status: HIT
x-qtl-request-id: dfa55f3549ee4fd0824472f83d06c6c5
x-via: 2.0 na-us-iad1-cache-0003 [HIT]
age: 13
server: QTL_Cache/1.2.03
accept-ranges: bytes
Our configuration is working as expected, so let's deploy it to production.
Deployment to Production
To deploy the configuration to production, use the Certificates and Edge Configurations pages.
- Go to the Certificates page first by clicking "Certificates" and choosing "Server Certificates". Then open the certificate, choose Deploy from the menu, set the deployment target to Production, and click Deploy Now.
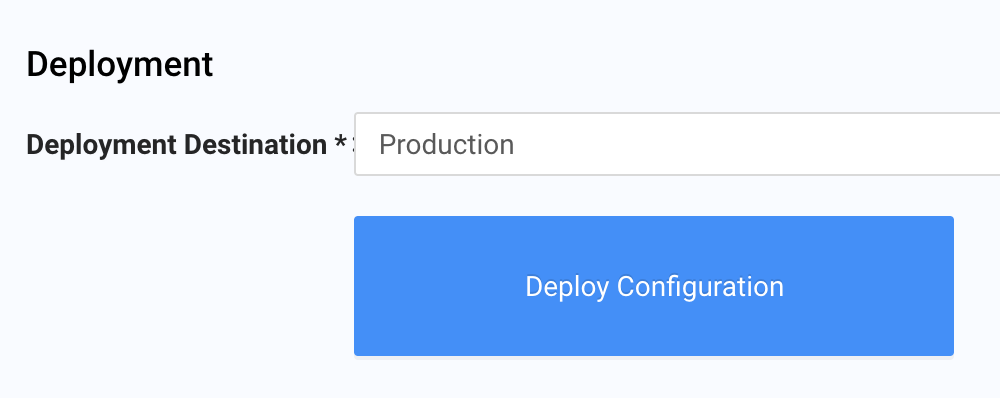
- Go to the Edge Configurations page. Then open the property, choose Deploy from the menu, set the deployment target to Production, and click Deploy Now.
Testing (Production)
Before we release the property to production, we should create or change the CNAME record of our DNS and point it to the edge hostname we created earlier (files-waytoo-digital.qtlcdn.com).
❯ dig files.waytoo.digital
...
;; ANSWER SECTION:
files.waytoo.digital.   299 IN  CNAME   files-waytoo-digital.qtlcdn.com.
files-waytoo-digital.qtlcdn.com. 19 IN  A   14.0.119.186
...
You can use the production IP address to check whether everything is satisfactory before you change the DNS record:
❯ curl -I https://files.waytoo.digital/file_1m.bin --resolve files.waytoo.digital:443:14.0.119.186
HTTP/2 200
content-type: application/octet-stream
content-length: 1024000
x-amz-id-2: gdpoBl4Uk1FbJ6i8tMHXYZRcPxAAR9NTY/EziqHr6Kbrni887rU+suUINzNof4sltrCRCq4I4TE=
x-amz-request-id: C30F30F6BE2B081E
date: Fri, 16 Oct 2020 03:21:14 GMT
last-modified: Fri, 16 Oct 2020 02:36:45 GMT
etag: "fcaebe20d9b3e73086dcb0ba5def8e52"
x-cache-status: HIT
x-qtl-request-id: 16a3be4dfdc381e44b90c86bec087f47
x-via: 2.0 as-kr-icn1-cache-0003 [HIT]
age: 5575
server: QTL_Cache/1.2.03
accept-ranges: bytes
Congratulations. You've just accelerated the Amazon S3 bucket with CDN Pro!
Accessing Private Buckets
Now let's block the public access to our bucket and set up CDN Pro to access it.
Block Public Access
Previously we made our bucket public. Now, in bucket settings, we will return the default permissions to their previous settings to make the bucket private again.
Enable Origin Authentication
Now we can edit our property settings and set up the Origin Authentication for S3. Before doing that, make sure you know the following items:
- AWS bucket region
- AWS access key
- AWS access secret
- Go to the Edge Configurations page and select the property you configured previously:
-
Click Clone to create a new configuration version. Now we can edit it.
-
At the right side of the Origins field, click Edit.
-
Expand Advanced Settings.
-
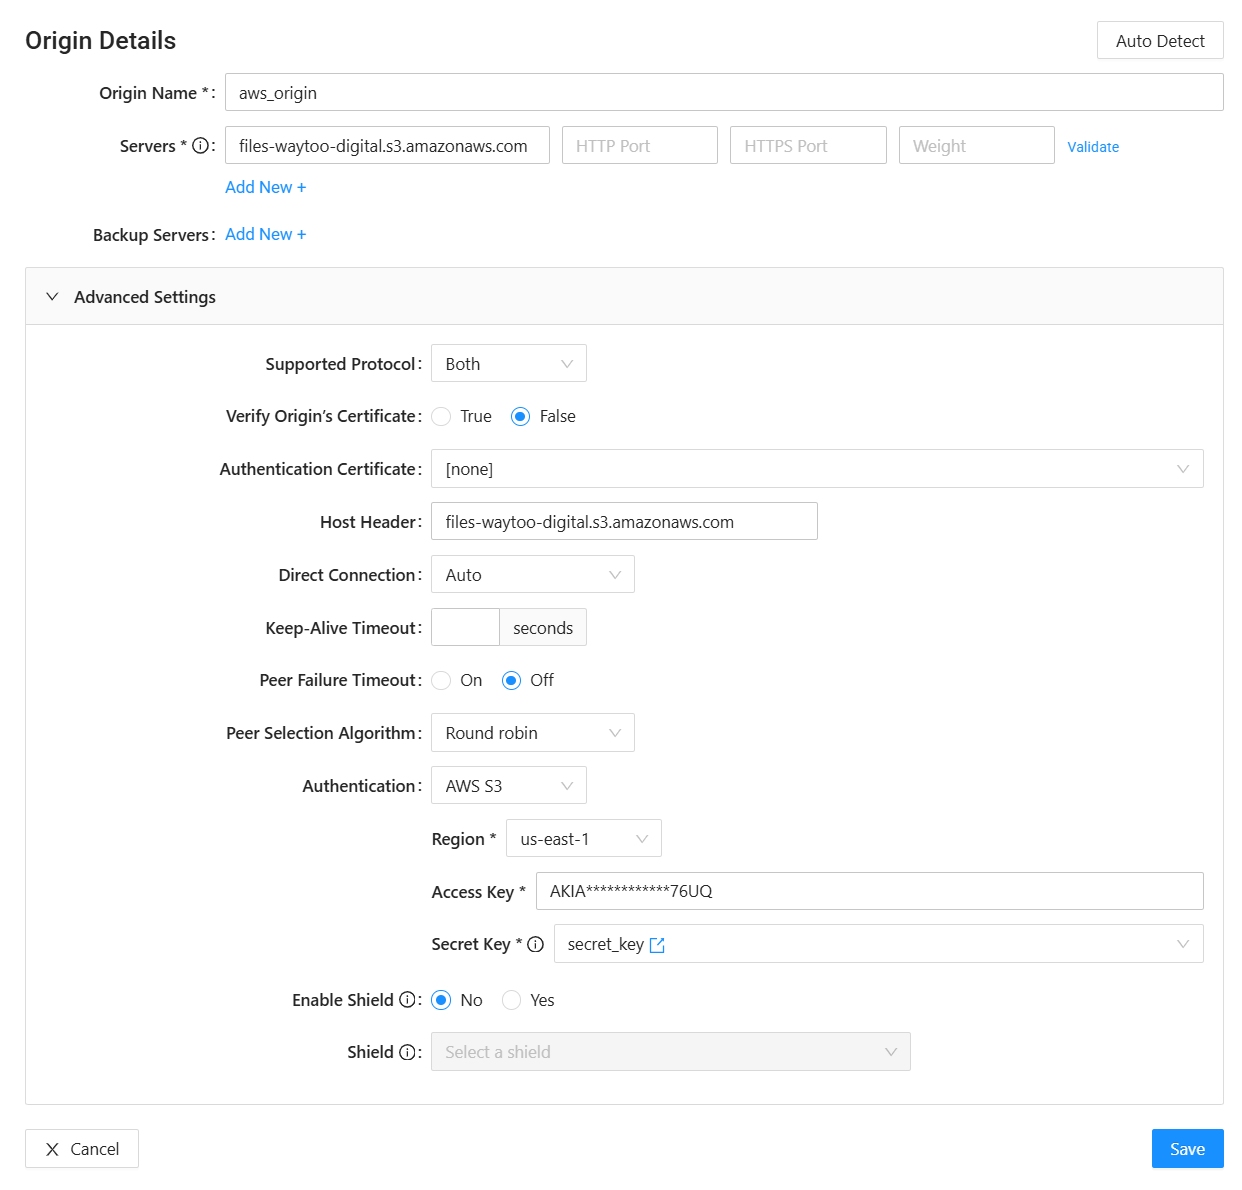
Set Authentication to AWS S3 and fill the required fields as follows:
- Click Save, and then deploy this configuration to staging. Make sure it works.
curl -I https://files.waytoo.digital/file_1m.bin --resolve files.waytoo.digital:443:163.171.228.89
HTTP/2 200
content-type: application/octet-stream
content-length: 1024000
x-amz-id-2: oTixActu2B9rtfEvOUDkmelQxPIgFYfRdC4T950YuXL/tv7Zu+pSHgkCXiAuouaRpjLpqTyf3xE=
x-amz-request-id: AQ7S4P0H1K0H0R9G
date: Fri, 16 Oct 2020 09:04:34 GMT
last-modified: Fri, 16 Oct 2020 09:04:10 GMT
etag: "fcaebe20d9b3e73086dcb0ba5def8e52"
x-cache-status: HIT
x-qtl-request-id: 105b10794ee438213fac428c0ef60379
x-via: 2.0 na-us-iad1-cache-0003 [HIT]
age: 16
server: QTL_Cache/1.2.03
accept-ranges: bytes
That's all there is to it! Now you can place your property into production.
ON THIS PAGE
AWS S3 Bucket AccelerationSetting Up an S3 BucketSetting Up CDN ProTraffic ManagementServer CertificatesDeploy a Certificate to the Staging EnvironmentEdge ConfigurationsTesting (Staging)Deployment to ProductionTesting (Production)Accessing Private BucketsBlock Public AccessEnable Origin Authentication